Building the IRG
This write-up describes how to build the IRG circuit and attach
it to your Atari 8-bit computer on a joystick port. The IRG could
also be used with other computers providing one TTL input and one TTL
output. (The joystick ports on the Atari are just PIA lines.)
Please see the write-up
for a description of software to control the IRG.
Detecting the 40kHz IR carrier turns out to be an easy task. Radio
Shack has started carrying the Sharp GP1U52X IR receiver hybrid circuit for
the relatively low price of $3.49 (about the same as mail order
prices). This remarkable little metal box has only 3 pins: power
(+5VDC), ground, and TTL out; it does all of the 40kHz bandpassing and
demodulation for you. Its output is low (0 volts) when 40kHz IR is
detected, and high (5 volts) otherwise. With no other parts, the
GP1U52X can be connected directly to the Atari joystick port, which
provides 5VDC.
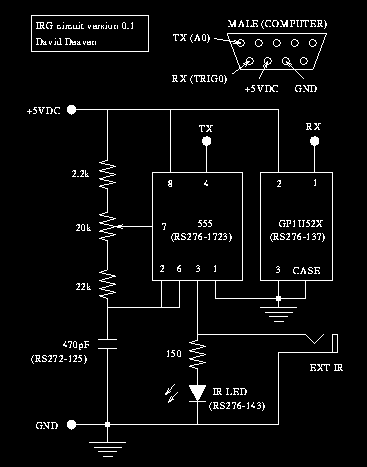
The IRG sends signals with the simple circuit shown in the
accompanying PostScript figure (hardware.ps). This circuit,
illustrated below, is

a standard oscillator based on the 555 timer chip and a few other
parts. The small variable resistor (trimmer) is used to adjust the
output frequency to precisely 40kHz. The 555 reset pin disables
oscillation when held low, so it can be connected directly to a PIA
output line. (On the Atari, the PIA lines are all configured as inputs
on power-up. Don't worry about plugging the IRG into your Atari even
if you don't have the IRG software driver running. It won't harm
anything to have the IRG input line connected to a PIA line configured
as an input.)
I used a small plastic case and mounted the 555 and related
components on a small piece of perfboard cut to fit inside. You can
use any style of circuit construction you are comfortable with. I
soldered small pieces of 22 gauge stranded wire to make the 555
circuit connections and to hook up the GP1U52X, which fits into a
corner of the case near a hole drilled to make a window for the IR
detector. I mounted one IR LED in another hole drilled into the case.
A small dab of super glue holds these nicely. Be sure that you connect
the ground pin and metal case of the GP1U52X together, providing a
shield against external electromagnetic signals, and isolating the
sensitive detector from the milliwatt 40kHz oscillator you are
installing in the same case! To connect the IRG to your Atari, I
suggest using a cable from a broken joystick, provided you have one
which has a +5VDC wire (the stock Atari joysticks do not). Refer to
figure 2 for the joystick pinout. Use a grommet or some epoxy to
secure the cable in place where it enters the box. If you don't have
an old cable, Radio Shack also sells DB9 connectors that fit into the
Atari joystick ports and you can make your own cable. However, the
ports work best with slimmer DB9 connectors. All of the parts required
to build the IRG are available at Radio Shack, and I've listed some
part numbers for you on the schematic.
I also put a mini phone jack carrying the 555 output on the rear
face of my IRG, which allows me to add extra IR LEDS with a
two-conductor cable. This is useful if not all of the appliances to
be controlled are in one place, or even in one room. With a 150 ohm
resistor the IR LED current is about 15ma, and the 555 can drive up to
200ma or so, allowing you to connect up to 10 IR LEDS in parallel to
the IRG (remember to include a 150 ohm current-limiting resistor
in series with each LED!).
If you have an oscilloscope, then once the IRG is wired up you
can adjust the trimmer so that the 555 is generating 40 kHz output. If
you don't have access to a scope, relax. Once you get the software
going, you can adjust the trimmer using a remote-controlled appliance
like a TV or VCR (see the write-up for
more details on using the software).
