Loading Atari ROM images into the Supercharger
Supercharger Overview
The Starpath Supercharger is a very interesting add-on for the Atari 2600. It was developed to reduce the cost of distributing games written for the system, but became much more than that. The idea was to create a cassette interface that allowed the loading of games into the Atari from a cassette player. Starpath succeeded, and while they were at it, they gave the Supercharger more storage space for game code than most of the Atari cartridge games had. Not only was there more room for game code, but all of the storage space could be used as RAM (Random Access Memory), unlike standard Atari cartridges which were limited to the 128 bytes of RAM. The games written for use with the Supercharger made it seem as though the Supercharger gave the Atari better graphics, but that isn't the case! The added RAM was nice, but the very high quality games released for the Supercharger can be attributed to two factors: Quicker turnaround time during game development and highly talented programmers. Turnaround time is the amount of time between writing game code and testing it. Before the supercharger, many game developers had to "burn" EPROM chips before they could test their code. This could take upwards of 5 minutes if an EPROM needed to be erased first. With the Supercharger, turnaround time was about 30 seconds!
Yeah, I don't wanna write a game, I just want to play em!
O.K. enough chatter already! So you got your hands on some Atari ROM images and want to try them out on a real Atari huh? Well, here's how to do it...
Necessary Items
- A computer - A PC clone with a soundcard, Amiga, or even Commodore 64 will do the job!
- An Atari 2600 - DUH!
- A Supercharger - Double DUH!
- Game (ROM) images - available on the internet - like Okie Dokie or Stell-A-Sketch on my homepage.
- A program for your computer for "playing" ROM images - like Makewav (DOS and Amiga), WPlayBin (Windows), and PlayBin (Commodore 64)
Optional items that might make the job easier
- An audio extension cable - For the PC, Preferrably a female mono 1/8" jack to a male stereo 1/8" jack, but a female stereo to male stereo will work. For the Amiga and Commodore 64, you will need an adaptor that has two Male RCA jacks on one end and a female 1/8" jack (mono or stereo will work) on the other.
- A cassette recorder
Loading Games Directly from your PC
Hooking everything up
Connecting your Supercharger to your computer is very simple, but first a word of CAUTION!!! I am not responsible for any damage you do to your computer, Atari, or Supercharger! Now with that out of the way :) All you really have to do is plug the cord coming out of the Supercharger into the Audio output of your computer. For a PC, that simply means plugging the cord into the plug labeled "Line/Speaker Out" (or something similar), this is the same place that your speakers plug into. In the case that the Supercharger's cable is too short (which is all too often), use the extension cable described above in the "Optional Items" list. For the Amiga, you will need an adaptor that has two Male RCA jacks on one end and a female 1/8" jack (mono or stereo will work) on the other. Don't get discouraged with this step. Finding the proper adaptors is well worth the time and money, and is probably the most difficult part of this exercise! Try Radio Shack, they generally have the necessary adaptors.
Below is a diagram of a how a standard PC would be hooked up:
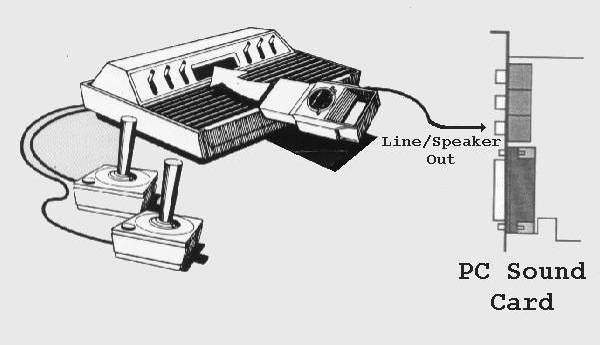
The Supercharger gets plugged into the Atari, and the Atari gets hooked up to your TV as normal.
O.K. I'm hooked up, now what?
Turn on your computer! WHAT! It's already ON? You should NEVER hook things up to your computer while it's on!
Now you need to get the proper program for loading the ROM images from the Internet. You can download Makewav for DOS and the Amiga and WPlayBin for Windows from my website. You can also get PlayBin for the Commodore 64, but I don't know the url for that right now :) (I'll get it and put it here). Follow the installation instructions for the program you will use. Now you need to get a ROM image to load. My suggestion is to get either Okie Dokie or Stell-A-Sketch written by me, or Oystron, written by Piero Cavina. They all work perfectly with an unmodified Supercharger. What's a modified Supercharger you ask? Well, not all ROM images work with a standard Supercharger because they "touch" a sensitive memory location. About 50% of the ROM images either won't play, or crash halfway through a game. Modifying the Supercharger lets you play all of the ROM images that are 2k or 4k in size. Even if you aren't planning on modifying your Supercharger, you can play a lot of games.
Loading the Games
Once you are hooked up and have the necessary software and ROM images, it's time to PLAY! Follow the instructions for the program you are using to load the ROM images. I could repeat them in detail here, but that would be a waste. I will however give you a brief overview of what to do. If you are using Makewav, you use the program to create a computer audio file (called a .wav file). Once this file is generated, you then use what is called a .wav player (this would include such programs as Media Player and Netscape) to play the audio file. If you are using WplayBin, you can use the nice Windows interface to choose the ROM image, and it automatically creates the audio file and plays it for you. First make sure your Atari is on and working. You should see the message "Rewind Tape, Press Play" on the TV screen (not on the computer screen silly!) As the audio file is playing, you should see the Supercharger screen go black, then bright bars should slowly appear from the right and left edges of the screen. These bars should slowly fill the screen until they meet in the center, at which point the game is loaded!
Alternatives to the Direct Hookup
There are two other ways to load games into your Supercharger. One way that is the best option if your Atari and PC are in seperate rooms is to plug one end of a cord into the "Line/Speaker Out" jack of your PC Soundcard and the other end to the "mic" jack of a tape player. Now, instead of playing the sound file directly into the Supercharger, you can record it on a tape. Once on tape, you can load the game just like any other original Supercharger game! The other option is a little bit more abstract, but I'll just mention it for completeness. If you have speakers plugged into your soundcard, you might be able to plug your Supercharger into one of them instead of directly into the soundcard. Many speaker pairs have amplifiers in one of the two speakers. Usually, the speaker with the volume control has the amplifier, and the second speaker is plugged into that speaker. What I do, is unplug the second speaker, and plug my Supercharger into the first. Now I still have one speaker that I can hear while my Supercharger is still hooked up to my PC. Before I load a game, I generally set my audio settings in Windows 95 so that the speaker balance is such that all sound goes to my Supercharger, just so I don't annoy my cats when I load a game :)
While this whole exercise may seem a bit too complicated, if you take your time and follow these instructions, you should be loading ROM images in no time. Once you have a quick and easy way set up to load games into your Supercharger, you are only a couple of small steps away from having an Atari 2600 development system! Now haven't you always wanted to write a game? :)
