Steve Ollett orders the most expensive
item on the menu!
The purpose of this guide is to explain
how GEM menus can be created and used in your own C
programs, and assumes that you will know at least the
fundamentals of C. If not, there are plenty of
guides available to teach this, not only on the internet,
but from your local library.
I have used Lattice C5.60 (including
the WERCS - Windows Environment Resource Construction
Program) for this program, but it should work on the
Alycon Compiler (freely available from the FREEGEM Webring)
and Pure C without much trouble.
The program was written on my PC while
using Gemulator 2000 (freely available from Emulators
Inc.) and has been tested on my own TOS 1.62 ATARI STE,
and *should* work on any ST, however, I would like to
point out that the attached code/listings is to be used
at your own risk and I cannot be held responsible for
any data loss, sleepless nights or natural disasters
arising from its usage.
If the text in this guide appears
to be a bit patronising, I apologise - but I would rather
explain things as clearly and basically as possible
so that people can grasp the fundamentals, and then
experiment for themselves at a later date.
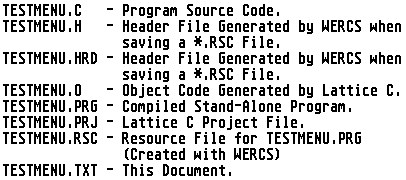
TESTMENU - What's included?
Included in the download file are
the following:
Test
the program
If you want to see what the finished
program is like, then run TESTMENU.PRG. Make sure that
TESTMENU.RSC is in the same directory or you'll get
an error dialog.
Starting from scratch
A good way to understand something
is to start at the beginning and work through it. So
that's what we'll do with TESTMENU.
First, lets create a folder on our
harddrive where we will save our files. Lets call it
TESTMENU.
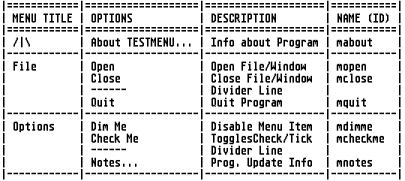
Design our menu
We'll design a menu with the following
features:-
NOTE: Only the contents of the first
2 columns will appear on our finished menu, the other
two columns inform us of what they will do, and their
ID Name which we will use in the main C Code when checking
if an option has been selected or not.
Create menu with WERCS
- Run LC5.PRG, Select 'WERCS' from
'Tools' option on the menu bar. Click [OK] or press
[RETURN] to enter WERCS.
- Select 'Languages' From 'File'
Option on menu bar.
- Select Radio Boxes 'C' &
'Mixed' then click [OK] or press [RETURN].
- Select 'Save Prefs' from 'File'
on menu bar to save settings made in (3.)
- A Resource File is like an upside-down
tree with smaller elements branching off like, erm,
branches. WERCS uses this idea of the resource tree,
and to start making our menu, from 'Tree' on the
menu bar, select 'Menu' to create our menu.
- A Dialog, titled ‘Name of Tree’
will appear asking for a name to be entered for
the menu we are creating. Press [ESCAPE] and type
in ‘menu1’(without the quotes). We could have put
in almost any name really, but whatever the identifier
name is used, the case of the name should be kept
constant or our C program will not be able to find
our menu!
- Click on EDIT to edit our new
menu.
- To rename 'Desk' to show our
Fuji (/|\), double click on 'Desk'. Where it says
'Text:' on the dialog, press [SPACE] then [CONTROL]+[N],
then [CONTROL]+[O] to get our Fuji, then [SPACE]
and press [RETURN]. We put in the spaces there so
that the menu title is not running into the start
of our next menu title.
- With the Fuji Option opened,
you'll see a line of text saying ‘Your message here’.
Double Click on that line of text, clear the text
by pressing [ESCAPE] and enter ' About TESTMENU...'
(without the quotes). Notice that we have put two
blank spaces before the text and three ‘.’s after
the text.
This is the convention for creating
menus as the extra space is required so that if
a ‘Check’ (or ‘tick’ if you’re British) if used
then the whole thing looks nicer if it’s spaced
out properly. The three periods (or fullstops if
you’re British) means that a dialog or alert will
follow if this option is selected. Also, if we leave
at least One space after the entry that makes it
look nicer too.
Tab to the next option
marked ‘name’ and enter our identifier name ‘mabout’
(all lower case, without the quotes) from our table
listed previously in this guide. Press [RETURN].
OK! First part done!
- Goto the ‘File’ Option on our
new menu. Double Click on ‘Quit’. Enter ‘mquit’
as the identifier name. Press [RETURN]
- From ‘Object’ on WERCS menu bar,
select ‘String’. The mouse pointer will change to
a small rectangle. Move the pointer until it is
over the ‘Quit’ entry, but to left of it, while
still inside the rectangle’s boarder line. Left
Click and a new entry called ‘STRING’ will be inserted.
Double Left Click on ‘STRING’. Change the text to
read ‘ Close ‘ (include spaces). Enter the name
as ‘mclose’.
- Follow No.11 in this guide for
the ‘Open’ option and the divider line.
Note - the divider line needs to have one spaces
in front of and behind it. Also, when you have created
the divider line, click on it once so that it is
highlighted, then select ‘disabled’ from the WERCS
‘Flags’ menu so that it appearance is ghosted and
cannot be selected when in your compiled program.
When inserting a string click the mouse pointer
over the item you want your string to be inserted
above, for example over the ‘Close’ entry.
- Okay, after creating the options
for the file menu, now we create the other options.
From ‘Object’ on WERCS menubar, select ‘Title’.
The mouse arrow will change to show a small ‘TITLE’
symbol. Move the mouse until its on the menu bar
you are creating and Left Click the mouse button.
Double Left Click on ‘TITLE’ and rename as ‘Options’
- Follow the above instructions
and enter the other options, including the identifier
names as set out in our table.
- When all is done, goto ‘File’
on WERCS menu bar and ‘Save As’ TESTMENU.RSC, making
sure that it is to our TESTMENU directory.
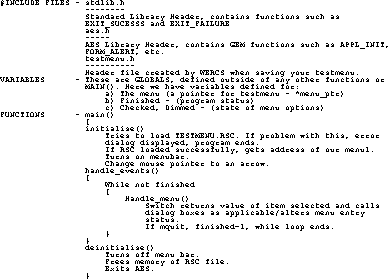
TESTMENU - The C code
I have included the code for TESTMENU
so that it doesn’t require re-typing and that you can
make whatever amendments you see fit. When you compile
the files, make sure that they are all in the same directory
so that nothing goes wrong.
TESTMENU - Compile with Lattice
C 5.60
- Run LC5.PRG
- 2. Load TESTMENU.C from ‘File’
- From ‘Project’ on menu bar, load
‘TESTMENU.PRJ’
If you don’t have the *.PRJ
file, or you want to set up Lattice to compile for
yourself, then do the following:-
- Under ‘Project’, select ‘New...’
and type in ‘TESTMENU.PRJ’ and press [RETURN].
- Under ‘Project’, select ‘Edit
"TESTMENU"...’ which opens the ‘Project
Management’ dialog.
- Under the box labelled ‘Input
Files’, click on ‘Add’, and using the fileselector,
locate ‘TESTMENU.C’, click on it and press [RETURN].
- ‘TESTMENU.C’ should now be
inside the ‘Input files’ box, and while it is
still highlighted, click on ‘Add’, this time
in the ‘Dependent files’ box. Locate ‘TESTMENU.H’
(Your header file for the resource file made
earlier with WERCS) and click on it and press
[RETURN].
- Press [RETURN] or click on
[OK] at bottom right of ‘Project Management
dialog’.
- Under ‘Options’ on menubar,
move mouse pointer over ‘Compiler’ and go across
to submenu. Click on ‘General’ to open a dialog.
Click on box for ‘Default short integers’ (as
we are only dealing with small numbers in our
program code), and click [OK} or press [RETURN].
- Select ‘EXECUTABLE..’ from
‘Options’ on menubar. Click on ‘Build GEM application’
box and click on [OK] or press [RETURN].
- Finally, under ‘Project’
on menu bar, click on ‘Save "TESTMENU"’
to save the settings just made.
- To compile and run your program,
select ‘Run "TESTMENU"’ from ‘Project’
on the menu bar. Lattice should now put a new window
on the screen as it compiles and links the program
code into a *.PRG file, named the same as the project
file - in this case it will be TESTMENU.PRG. if
all goes well, there shouldn’t be any error messages
and Lattice will run TESTMENU.
You can
then try out all of the functions. Select ‘Quit’
to close the program.
TESTMENU - C code explained
(I hope!)
Okay, so I’m not an expert, but I
hope it gives you a bit of an idea of what is going
on. As I’ve no doubt said before, the best way to learn
is to alter the example code and see what happens.
As for me, I’ll take a deserved rest
until next time.
Steve Ollett |
![[ MyAtari Advert ]](images/banner.gif)