16K Cassette or Disk
by Same Wiley
16K Cassette or Disk
by Same Wiley
If you're like me, you love to write programs but hate to even think about the mental and physical work involved in keeping track of line numbers as you program. After all, we geniuses need to think about program logic and not the next line increment!
This utility will do four things. First, it will put line numbers on the screen. Second, it will check the line that you typed in for an error and BEEP you by ringing the bell. This is also known as printing CHR$(253) or hitting CTRL-2. Third, it displays, near the top of the screen, how many variables you have left and, also, how much memory you have left. Fourth, it disables the BREAK key and the clear screen keys. There is also full-screen editing of the lines that are on the screen. You can change the starting line number, or the increment, by pressing CTRL-3 and typing GOTO AUTO. After hitting CTRL-3, you can LIST your program, edit it or add statements. The utility will go back to the next line that it was working on, before CTRL-3 was pressed, by typing GOTO NEXT.
Although most of it is in BASIC, it uses the "forced read mode" to read the entire screen every time RETURN is pressed. This is what allows for full screen editing. There is a short machine language subroutine to check the entire BASIC program for an error and find out how many variables have been defined. Both of these functions work very fast, so there is hardly any wait while you are entering your program. The program that you are typing in can be separated from the auto-numbering utility by LISTing it to the disk or cassette with the line numbers 0-31999. Here is an example: LIST "D:YOURPROG.EXT",0,31999. This will only LIST your program to the disk. For a cassette-based system, use LIST "C:",0,31999. Lines 32045 and 32055 contain the REM equivalent of these statements. I suggest you type in whichever one applies, and then you can delete the line number and the REM. For disk users, fill in the name that you want to call your program on Line 32045. Press RETURN, and it will be properly LISTed to disk. Cassette users can use Line 32055. By using the LIST command, you will have to use the ENTER command to get your program back into the computer. I suggest you use the SAVE command to save this utility and the LIST command to save your program. This way you can always merge the two by loading the utility first and then using ENTER to load your program.
The machine language subroutine is placed in a string (ML$) to allow access to page 6. The BREAK key is disabled, because it was put too close to the RETURN and editing keys on the 800. Instead you use CTRL-3 to interrupt the auto-numbering process. This will also restore the BREAK key for normal editing.
Type in the program and use one of ANALOG's error-checking programs, C:CHECK or D:CHECK. I just can't say enough about this idea for typing in programs from printed media. Until they came along, I always thought that the magazine was printing the wrong code. No way. I learned what a really lousy typist I was. At any rate, after the CHECKSUM DATA checks out, type RUN. The screen will go blank for a few seconds, while the utility loads the machine language subroutine into the string. The first thing that prints is "STARTING LINE NUMBER?" Answer with the line number you want to begin auto line numbering with. If you don't answer with a number, the utility will repeat the question. The second thing you are asked is "INCREMENTS DESIRED?" Answer with the number of lines that are to be between each line number. A good number is 10. This way you can insert 9 lines between each line that you type in, if you find out later that something new should be added.
Next, the first line will appear, and the utility will wait for you to enter a statement. All of the keys are accepted, with the exception of CTRL-CLEAR and SHIFT-CLEAR. These keys are useless during screen editing. If the ESC key is pressed prior to CTRL-CLEAR or SHIFT-CLEAR, it will accept the key(s). When RETURN is pressed, the screen blanks for a second. If there was no error in the line, it will click the console speaker to alert you that it is ready to accept the next line. This is so you don't have to look away from whatever you are typing in. At the top of the screen will be the utility commands. They are: 1. CTRL-3 -- Use instead of BREAK key; 2. G.NEXT -- GOTO next line number of a predefined increment; and 3. G.AUTO -- Set up new line numbers and increments.
Under this is displayed how many variables are left and how much memory is left. The memory is displayed as "BYTES LEFT=". The last two lines are displayed, along with the next line. If there was an error in the line you typed in, the console bell (CTRL-2) will ring, and the only thing on the screen will be the error line and statement following it. The cursor is positioned at the beginning of the line number. Be sure to remove the ERROR- and also the cursor that shows where the error is, to avoid getting another error. When it is corrected, press RETURN, and the utility will go to the next line number.
You may also use the utility to delete lines of code. Type GOTO AUTO and give the starting line number and increments of the lines that you want deleted. Then just hit RETURN when the line numbers appear. I also use it to type in programs from magazines and books. Sometimes the line numbers are not in even numerical increments (like in this program). When this is the case, you have to use the GOTO AUTO to keep changing the starting line number and the increments. For myself, it's most useful for program development from scratch.
You may wonder why the utility only LISTs two of the previous program lines. In studying the listing, you will see that Line 32113 can be modified to LIST three or even four previous lines. For instance, after the TRAP statement, a LIST LINE-INC*3 will LIST the last three lines. The reason for the two lines is due to the Atari being in the "forced read mode." Even though the CONT is at Line 19, if there are three full lines on the screen (a logical line can be four physical lines), and the fourth line contains an error, the error message could cover up the CONT, and the computer never regains consciousness until SYSTEM RESET is pressed. In the "forced read mode," if a line is encountered with an error, the line is immediately displayed again with the ERROR- message.
This is what can cover up the CONT, which is used to exit the mode. Without the CONT, the mode can't be exited, so we get a blank screen. While we're on the subject, there is also one other thing that can cause no exit. If you want to ring the bell and clear the screen, the code is: [Linenum] PRINT "[ESC CTRL-2 ESC CTRL-CLEAR]". If you leave out the leading quotation mark, an error line is generated. The screen is cleared and ZAP! No CONT. This one should be a rarity, but it did happen to me. When I first wrote the utility, Line 32081 wasn't in it. This is the ESC checking line. I added it later to insure that all of the keycodes could be accepted, to make the C:CHECK and D:CHECK kind of programs produce the correct data. Without this line, only ESC CTRL [SHIFT]-CLEAR is masked out. At any rate, feel free to experiment.
The utility consumes 27 of the 128 variables that you can possibly have. I did it this way to conserve RAM. If you need more than 101 variables, you can substitute the variables on Line 32061 to numbers and change them in the program.
If you type RUN after you have keyed in some or all of your program, you will need to type GOTO 32000 to restore the auto line numbering utility.
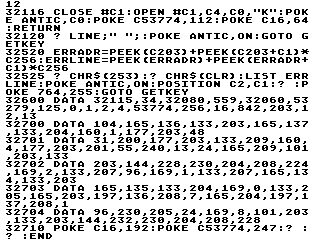
32000 DATA 817,853,381,628,829,564,188
,613,65,889,900,577,885,821,234,9244
32060 DATA 489,905,547,686,813,199,265
,153,32,582,86,942,593,267,511,7070
32113 DATA 83,424,117,529,817,770,866,
226,606,578,931,723,409,419,7498AUTONUM.ASM is available in ATASCII format.
;   CODE IN DATA STATEMENTS
;    AT LINES 32700-32704
;
;  SEARCH THE BASIC PROGRAM
;  FOR ERRORS AND VARIABLES
;
;        SET UP EQUATES
;
VARTAB=134           ;Var valu table
NUMVAR=205           ;For BASIC
STMTAB=136           ;BASIC's start
NEXLINE=209          ;Storage
ERRFLG=207           ;For BASIC
POINTER=203          ;BAS zero page
ERROR=55             ;BOO-BOO
;
;     POINT TO STATEMENTS
;
 *=1664              ;ASM use only
 PLA                 ;Don't need
 LDA STMTAB          ;Set up zero
 STA POINTER         ; page pointers
 LDA STMTAB+1        ; for BASIC
 STA POINTER+1       ; search.
;
;         LAST LINE?
;
NEXT LDY #1          ;End loop if we
 LDA (POINTER),Y     ; reached the
 BMI RETURN          ; last line.
;
;    GET NEXTLINE POINTER
;
GETNEXT INY          ;Point to next
 LDA (POINTER),Y     ; NEXTLINE byte
 STA NEXLINE         ; and keep it.
;
;       CHECK FOR ERROR
;
 LDY #4              ;COMMAND offset
 LDA (POINTER),Y     ;Point to it
 CMP #ERROR          ;Error?
 BEQ RETURN2         ;Yes-Return a 2
;
;       UPDATE POINTER
;
 CLC                 ;No error so
 LDA NEXLINE         ; let's get the
 ADC POINTER         ; next line's
 STA POINTER         ; address and
 BCC NEXT            ; go back to
 INC POINTER+1       ; check some
 BNE NEXT            ; more.
;
;      WE FOUND AN ERROR
;
RETURN2 LDA #2       ;Tell BASIC we
 STA ERRFLG          ; goofed. (POKE
 RTS                 ; 207,2)-- exit
;
;         NO ERROR
;
RETURN LDA #1        ;Tell BASIC no
 STA ERRFLG          ; boo-boo's.
;
;     HOW MANY VARIABLES?
;
 LDA VARTAB          ;Set up zero
 STA POINTER         ; page pointers
 LDA VARTAB+1        ; for variable
 STA POINTER+1       ; search.
;
;         INITIALIZE
;
 LDA #0              ;Put a zero in
 STA NUMVAR          ; our counter
;
;       LAST VARIABLE?
;
NEXTVAR LDA POINTER  ;Last one
 CMP STMTAB          ; yet?
 BNE INCREM          ;No add 1 more
 LDA POINTER+1       ;How about
 CMP STMTAB+1        ; now?
 BNE INCREM          ;No add 1 more
 RTS                 ;Now you may go
;
;     GET NEXTVAR POINTER
;
INCREM INC NUMVAR    ;Add 1 more
 CLC                 ;Get set to add
 LDA #8              ;Var # offset
 ADC POINTER         ;Let's update
 STA POINTER         ; our pointers
 BCC NEXTVAR         ; and continue
 INC POINTER+1       ; our search.
 BNE NEXTVAR         ;Uncond. branch