

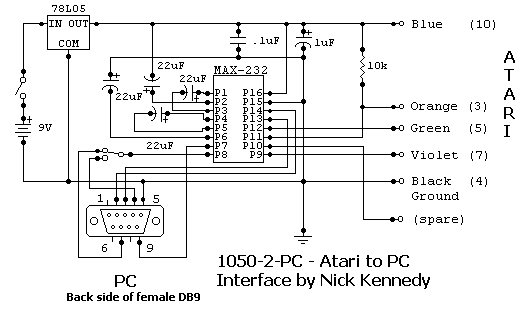
This is the circuit that is used by Nick Kennedy (the devoleper of the SIO2PC software) as seen on his page. It uses a MAX-232 RS232 to TTL level converter. It can be used with either the 1050-2-PC submenu function of the SIO2PC software or the Ape ProSys software. I added a toggle switch to chose between RTS and DTR. This design is somewhat more expensive than the 14C89 (75C189) version below.
NOTE: This version of the interface will work with either the 1050-2-PC or ProSys software. It uses a DPDT switch (either toggle or slide will work). At the moment it is set to work with ProSys. Flip the switch and it will work with 1050-2-PC software. The 1050-2-PC software & interface uses the RTS (pin 7) signal line of the PC for the command line on the Atari. The ProSys software & interface uses the DTR (pin 4) signal line for the command line and uses the RTS (pin 7) signal line for power. Added cost, 59 cents for the switch from Radio Shack.
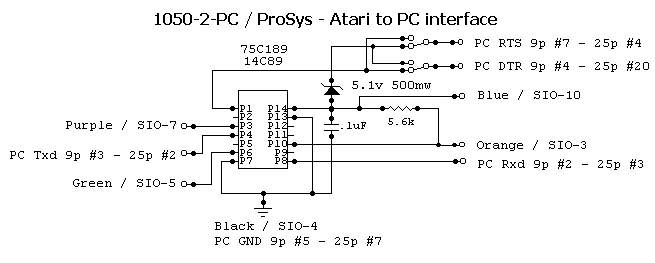
NOTE: This version of the interface is for use with the ProSys software and WILL NOT work with the 1050-2-PC submenu function of SIO2PC. The 1050-2-PC software & interface uses the RTS (pin 7) signal line of the PC for the command line on the Atari. The ProSys software & interface uses the DTR (pin 4) signal line for this and uses the RTS (pin 7) signal line for power.
NOTE: To make this work with 1050-2-PC, you will need to connect pin 4 of the DB-9 (pin 20 of a DB-25) to the top of the Zener Diode and pin 7 of the DB-9 (pin 4 of a DB-25) to pin 1 of the 14C89 IC.
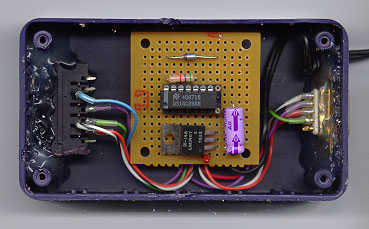 |
Here is a picture of the first PROSYS I built. Notice the 7805 regulator. I originaly used a 1489 and couldn't get the zener working so I added a wall wart and the regulator to get 5 volts for the interface. I still use this box as it works very well. Yea, it does have a 14C89 in it now and maybe I'll change it to get it's power from the zener and RS232 port some time. |
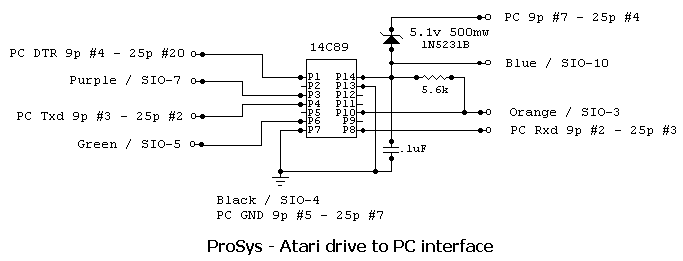
The ProSys interface.
What is a "ProSys" interface? Again as you can see from the schematic above not all that much at all. Again 4 parts, some wires and connectors. You don't need much as you only will be connecting an Atari disk drive to your PC.
The normal ProSys interface can be either a Atari SIO cable with a RS232 connector and electronics grafted onto one end or an Atari SIO (13-pin) plug and cable on one end, a RS232 (9 or 25 pin) plug and cable on the other end and some electronics in a box in between plus a program called "ProSys" running on your PC.
NOTE: You can eliminate the 13 pin SIO socket and the 9 pin RS-232 socket and save some money (about $4.00). The reason I used then is I didn't want to cut up a SIO cable and I had some SIO sockets in the parts bin.
You can build a ProSys interface for under $12.00 if you have to buy all the parts or under $3.00 if you have a Atari SIO cable.
These Prices are from JDR Microdevices, www.jdr.com
| QUAD RS232 RECEIVER (75C189) 14P | DS14C89 (75C189) | $.89 |
| RESISTOR - 5.6K OHM 1/4W, 5% | R5.6K | $.05 |
| DIODE - 5.1V 1W ZENER | 1N4733 | $.17 |
| METALIZED PLASTIC HOOD 25 PIN | MPHOOD25 | $.50 |
| D-SUBMINIATURE 25 PIN PLUG | DB25P | $.59 |
| TANT. RADIAL CAP .1UF 35V(50V) .1LS | T.1-35 | $.15 |
NOTE:
You can save $8.00 by using a SIO you already have. NOTE:
I have seen SIO cables running from $1.50 to $9.00, so look
around if you don't have one.
Note: I no longer bother with an Atari SIO cable as I build the interface into the disk drive. Works just as well and costs less.
The only connections to the I.C. are to pins 1,3,4,6,7,8,10,13,14. The .1uf cap is between pins 7 and 14 and should be right at the I.C. or socket. It is for decoupling the I.C. and is important.
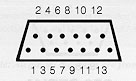 |
This is the SIO plug when looking at the back of the Atari. |
Sio Orange  (Sio Pin  3) -> 14C89 Pin #10

Sio Black   (Sio Pin  4) -> 14C89 Pin #7

Sio Purple  (Sio Pin  7) -> 14C89 Pin #3

Sio Green   (Sio Pin  5) -> 14C89 Pin #6

Sio Blue    (Sio Pin 10) -> 14C89 Pin #14


PC Ground   (9p #5) (25p #7 ) -> 14C89 Pin #7

PC DTR      (9p #4) (25p #20) -> 14C89 Pin #1

PC RXD      (9p #2) (25p #3 ) -> 14C89 Pin #8

PC TXD      (9p #3) (25p #2 ) -> 14C89 Pin #4


(you can sub a 75C189 for the DM14C89)
Connect the SIO end of the ProSystem interface to a stock 810 or 1050 disk drive. Make SURE there are no other peripherals attached, and there is no Atari computer attached to the drive. The drive ID of this drive should be set to 1. Now hook the serial end of the cable to a free serial port on your PC. It's very important you use a stock 1050 or 810 disk drive. Drives modified with Happy enhancements or other boards that have buffers will effect the performance of the ProSystem. Happy drives may be used if placed in 'Unhappy' mode first. Also check your 810 or 1050 drive to make sure it is working with your Atari computer. I ran into this problem the other day with a 1050 that worked fine when connected to a 1200XL but wouldn't work connected to the ProSys interface. I switched drives and everything started working. Also, make sure your PC has a 16550 or 16C550 or better UART in it. Some of the old 8250 and 16450 UART's are a little iffy.
If you need help in building the ProSys Interface, you might look into a local Amateur Radio Club, Junior College Electronics Class or High School Electronics Class.
