


This is the circuit that is used by Nick Kennedy (the devoleper of the SIO2PC software) as seen on his page. It uses a MAX-232 RS232 to TTL level converter and is somewhat more expensive than the 14C89 (75C189) version below. Either interface will work just fine. I have built all the different interfaces shown on the pages and some not shown. There is little or no performance difference between any of them in normal operation.
NOTE: If you are using the SIO2PC software, connect pin 6 of the 14C89 (75C189) to the the PC RI pins. If you are using the newer APE software (v1.16), you can connect pin 6 of the 14C89 to either DSR or RI but change the software to reflect this. If you are using WinApe, use the DSR hookup. Works better. The diode should have a low forward voltage drop. A 1N270 would work or just about any schottkey or even the humble 1N4148. What we are looking for is less than .6 volt drop here.
Above is a modification to the original circuit. It may help in some instances where adding a real disk drive to the SIO chain loads the system and causes errors. You may have to add a similar circuit to the data input line also. If this is the case, you would better off making the 2 chip 14C98/CA3086 or MAX233/CA3086 interface.
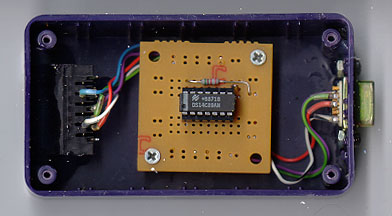 |
This is a picture of one of the SIO2PC interface box's I have built. I cut holes in each end of the project box and then hot glued the 13 pin Atari SIO socket in one end and machine screwed the 9 pin female RS-232 socket in the other end. The parts were assembled on a Radio Shack proto board. Everything but the .1uf cap is on the top. |
What is a "SIO2PC" interface? As you can see from the schematic above, not all that much unless you build the my 2 chip version. 4 parts, some wires and connectors. Actually it can just be the 14C89 and connectors is you will never hook anything else to the Atari SIO connector.
The normal SIO2PC interface can be either a Atari SIO cable with a RS232 connector and electronics grafted onto one end or an Atari SIO (13-pin) plug and cable on one end, a RS232 (9 or 25 pin) plug and cable on the other end and some electronics in a box in between plus a program called "SIO2PC" or " Atari Peripheral Emulator", running on your PC.
NOTE: You can eliminate the 13 pin SIO socket and the 9 pin RS-232 socket and save some money (about $4.00). The reason I used then is I didn't want to cut up a SIO cable and I had some SIO sockets in the parts bin.
You can build a SIO2PC interface for under $12.00 if you have to buy all the parts or under $3.00 if you have a Atari SIO cable. I built and installed a 2 chip version in a 130XE. Cost, under $10.00 and it works with all peripherals I have tried.
These Prices are from JDR Microdevices, www.jdr.com
| +5v dual RS232 Transmitter/Receiver | MAX232CPE | $1.89 |
| 22uf Radial Electrolytic Capacitor | 22R35 | $.10 |
| TANT. RADIAL CAP 1UF 16V 1LS | T1.0-16 | $.15 |
| RESISTOR - 10K OHM 1/4W, 5% | R10K | $.05 |
| QUAD RS232 RECEIVER (75C189) 14P | DS14C89 | $.39 |
| RESISTOR - 5.6K OHM 1/4W, 5% | R5.6K | $.05 |
| DIODE 75PIV SWITCHING (1N914/1N914A) | 1N4148 | $.04 |
| METALIZED PLASTIC HOOD 25 PIN | MPHOOD25 | $.50 |
| D-SUBMINIATURE 25 PIN PLUG | DB25P | $.59 |
| TANT. RADIAL CAP .1UF 35V(50V) .1LS | T.1-35 | $.15 |
| From 0 to 4 drives at a time, each numbered anywhere from "D1:" to "D8:". | |
| Optional P:rinter emulation (print through to the PC printer, PC file or PC screen; with or without translation of things like: EOL->CR or CR/LF, Atari TAB->PC TAB, strip 8th bit). | |
| RS-232 emulator (access PC's other COM port(s)) using "APE". | |
| Disk images of up to 16mb in size, or as small as 128 bytes. | |
| Write protect disk images ("APE" only). | |
| Access your PC's files directly: | |
| Navigate through your PC ("APE/PC `mirror' mode"). | |
| Install PC files as Atari disks. | |
| Write files to the PC (using special software or sending them to a non-translated P:rint-to-PC-File with SIO2PC; or with the PC "mirror" navigation of "APE") |
NOTE: If you're positive the SIO cable will never be used with other Atari peripherals like a 1050 drive, you don't need the diode and resistor. However, I would add it anyway. It simulates an open collector transistor and allows multiple devices to be on the SIO BUSS. If you do use a diode, make sure it has a low forward voltage. Any diode with a .65v forward voltage drop will work just fine. This means you can use any germanium diode & probably most small signal diodes like the 1N270/1N914/1N4148. The only connections to the I.C. are to pins 1,3,4,6,7,8,10,13,14. The .1uf cap is between pins 7 and 14 and should be right at the I.C. or socket. It is for decoupling the I.C. and is important.
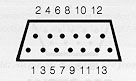 |
This is the SIO plug when looking at the back of the Atari. |
Sio Orange  (Sio Pin  3) -> Diode Clear End & Diode Band End -> 1489 Pin #8

Sio Lt Blue (Sio Pin 10) -> 1489 Pin #14

Sio Black   (Sio Pin  4) -> 1489 Pin #7

Sio Purple  (Sio Pin  7) -> 1489 Pin #4

Sio Green   (Sio Pin  5) -> 1489 Pin #1


PC Ground   (9p #5) (25p #7) -> 1489 Pin #7

-------------------------------------------

Note: If you use Ape, you can use the DSR pin.

      If you use SIO2PC, use the RI pin only.

             ---------------

PC DSR      (9p #6) (25p #6) -> 1489 Pin #6 (Use for Ape and set software)

PC RI       (9p #9) (25p #22)-> 1489 Pin #6 (Use for SIO2PC)

-------------------------------------------

PC RXD      (9p #2) (25p #3) -> 1489 Pin #3

PC TXD      (9p #3) (25p #2) -> 1489 Pin #10
If you need help in building the SIO2PC, you might look into a local Amateur Radio Club, Junior College Electronics Class or High School Electronics Class.
Also, the standard Atari disk image (which was around long before SIO2PC or the Atari 8-bit emulators) is ".DCM" - "DiskCommunicator". This can of course make boot disks. To boot your Atari with a DOS, you'll need a DOS disk.
Some DOSes available
include:
Atari DOS 2.0
Atari DOS 2.5
MyDOS 4.5x
SpartaDOS 3.2x
(where "x" is some number or letter).
You can download
MyDOS 4.5x or SpartaDos
3.2x here.
(Note: This is the latest version of MyDOS and corrects a
bug when doing a MEMSAV)
Pin-outs for the DB9 and DB25 connectors.


Signal Name                   DB9       DB25

---------------------------------------------

DCD (Data Carrier Detect)      1          8

RX  (Receive Data)             2          3

TX  (Transmit Data)            3          2

DTR (Data Terminal Ready)      4         20

GND (Ground)                   5          7

DSR (Data Set Ready)           6          6

RTS (Request to Send)          7          4

CTS (Clear to Send)            8          5

RI  (Ring Indicator)           9         22
