


The following is for the purists in the crowd. This circuit preserves the high impedance inputs and open collector output of the standard Atari interface. This high impedance input is what allows you to connect more than one peripheral to the SIO buss. With the single chip version of the interface, some people report poor performance. The 2 chip design will correct this. These interfaces are based on the Atari 850 interface I/O and work very well. With this circuit, I am able to connect other peripherals to the 130XE (the ATR8000/8500 works great now) and still have everything work. I can even connect a single chip 14C89 interface to the 130XE and everything still functions as it should.
This circuit is a little more complicated but well worth the extra effort involved. Actually, there are 2 circuits. One with a 14C89 RS-232 interface and one with a MAX233cpp interface. Both work very well.
NOTE: Remember to change the signaling from RI to DSR if you are using the Windows 95/98 version of APE.
The cost of the interface is still under $12.00 and all parts can be purchased from JDR Microdevices www.jdr.com or from Jameco Electronics www.jameco.com. The proto board I used came from RadioShack, part #276-150 and cost $1.19.
NOTE: If you are using the SIO2PC or a version of Ape before 1.16, connect point "A" to point RI. If you are using a version 1.16 or above of Ape or WinApe, connect point "A" to point DSR and change the software to reflect this. This is the default for WinApe. Or you can do like I did and add a small slide switch or jumpers so you can use either.
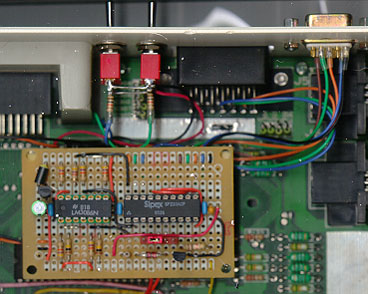
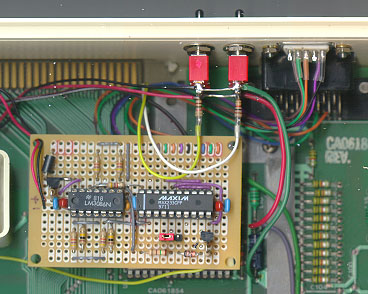
Here are two pictures of the interfaces I have built. I stuffed one in the upper right corner of a 130XE and the other in the upper right corner of a 800XL. You can see the 9 pin RS-232 connector in the upper right. The 2 switches are for Steven Tucker's Ape Warp+ OS 4 in 1. This is a great replacement OS as it allows you to run just about every old 400/800 game on the 800XL/130XE computer. I added a speaker driver in the lower right of each proto board. ( Sorry about the pictures. I just put the cases on the scanner and scanned them in. Oh, the switches on the 800XL do nothing right now as I need to get another Ape Warp OS. I modified the OS ROM socket and board so all I have to do is plug it in when I get it.)
NOTE:
On the 800XL, I picked
up the +5vdc and ground from C79. You can see the Red and
Green leads coming off the right hand switch and going down to the main
circuit board. The Red lead was soldered to the positive side of C79 and the
Green lead to the negative side. The power for the interface is taken off the
+ and - sides of the switches.
On the 130XE, I picked up the +5vdc and ground from C79 also. It's in a different place but has the same designation. It's just to the right of the cartridge slot looking from the front.
|
|
| 130XE | 800XL |
This interface is not that hard to build. You just have to go slow and watch what you are doing. Solder bridges are one of the most common problems you have. Always check your wiring and use a magnifying glass if you have to. I power up the circuit and check all voltages before I ever install the interface in the computer. You can find a lot of errors this way. I did run into one problem with the 800XL interface, I couldn't get it to work. I checked and double checked everything. Come to find out, it was a flaky LM3086. I must have spent 2 hours fiddling with the circuit. Anyway, I should have known better. I am thinking of doing a layout and having some pc boards made. This should eliminate all errors in assembly.
