Dallas "ROMs"
( part 2 of SmartOS)
by Bob Woolley


In the SmartOS modification that we had last year, the core
of the project was a non-volatile static RAM. The stock Atari is built with
either an EPROM or ROM for the storage of die operating system code. These
devices retain whatever data is written to diem without die aid of external
circuitry or power. The problem is, you cannot alter their contents once they
are programmed. Any changes you would like to make in the OS require die removal
and replacement of the chip. The cartridge, MIO interfaces, the 1050 and 850,
also have ROMs or EPROMs that score code. Changing code in any of these devices
is difficult. The static RAM devices, such as the 62256, have the same pinoucs
as an EPROM of equal size and can be altered just like any RAM memory.
Unfortunately, the data in a RAM will not survive a power down, Once the power
is turned off, all data is lost. The SmartOS presented a method of retaining
data in one of these RAM chips through numerous power cycles, giving us the
ability to alter our OS as often as we like.
Never being content to
leave something alone, I have made a few modifications to the SmartOS
modification. The alteration I will describe here is to the method used to
retain data in our static RAM chip. In the first design, I used a Dallas Smart
Socket to provide all the necessary components. All you did was plug in a static
RAM and you were up and running. This makes for a simple project but it left
something to be desired from my point of view. First, the battery was internal
and not replaceable. Sure, they last 10 years. Usually. I can just imagine my
RAM chip blowing it's brains out and shorting out the battery in the Smart
Socket. No more Smart Socket. I can also see wanting to use a larger RAM (128K
or 512K). Can't use a single Smart Socket for that either... Or multiple RAMs.
What was needed was a little more flexible setup.
And, if it's a few bucks cheaper - great!
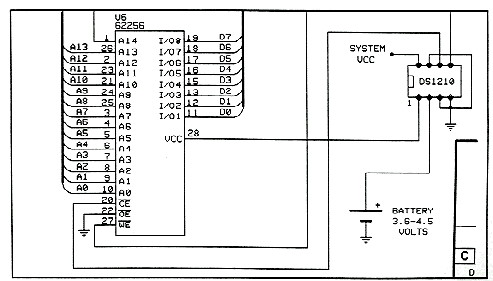
Take a look at the Smart IDE
schematic. The lower right hand corner is a sketch of the data retention
circuit. Again, we use a Dallas Semiconductor part, but instead of the whole
assembly, we only use the controller chip - a DS1210 This chip provides the
sensing and control circuits to prevent data loss while power is being cycled,
completing any write cycles and switching in the battery when needed The battery
may be either a PC style 3.6 volt lithium cell or three ordinary penlight
batteries (4.5 volts). Either battery will supply much more power than is
available in the Smart Socket and can be replaced easily and cheaply. As an
added benefit, the cost of the DS1210 is only about five bucks.
The
DS121O has three main functions. Although you may chink that the power goes off
instantaneously when you turn off your computer, in computer time, it takes
quite a while. The DS1210 watches the +5 volts from your computer (connected at
pin 8) for a drop of more than .25 volts. If it sees such a dip, it assumes that
the power is going off and prepares the RAM for data retention. First, it checks
to see if you are selecting RAM with the chip select line from the computer
logic (connected at pin 5). If RAM is being used, the DS1210 waits for
it to finish (chip select at pin 5 goes high). It
then holds the chip select output to the RAM (pin 6) at a high level, ignoring
any more changes at the chip select input. This prevents the RAM from being
"glitched" while power is going down. The DS1210 also connects it's battery
(connected at pin 2) to the VCC pin of the RAM (connected to pin 1), to supply
enough power for the RAM to retain all the data currently stored in the chip. On
powerup, the DS1210 disconnects it's battery, allows chip selects from die
computer and you're back in business with all of your original data intact. You
may even connect a second battery to pin 7 if you are really worried about
losing your data. The DS1210 will then switch to this backup battery if the main
battery goes dead (seems like overkill in this application - I didn't use this
feature).
All in all, the DS1210 is just perfect for this application.
Many, many power cycles have been executed on my RAM with no problems
whatsoever. Although I show a 32Kx8 RAM in the schematic, I actually used a
128Kx8 bit unit in my controller. With the DS1210 I could use any size RAM I
wanted - may even do a 5l2Kx8 bit ramdisk with this guy. The DS1210 worked fine
and, it's a little bit cheaper than a Smart Socket. There are also other
versions of this controller chip that will control up to 8 RAM chips - for those
really big projects. Now, you have two ways to replace your EPROMs and ROMs, so
get busy and hack a new 1050 or something!
These pages created and maintained by Clarence Dyson.
Copyright © 2001 Clarence Dyson. All rights
reserved.
Any reproduction, duplication, or distribution in any form
is
expressly prohibited, except by consent of credited creators.
Ride Free, Citizen