EVERYTHING YOU WANTED TO KNOW ABOUT YOUR ATARI
BUT WERE AFRAID TO ASK (PART 2)
CARTRIDGES
Ever wondered about cartridges? I remember the days when they were endless loops of tape
you used to play in the car, but today's cartridges are ROM or EPROM
integrated circuit chips.
A ROM is a Read Only Memory chip meaning that the program is put in during manufacture and cannot be changed by the user. Due to the complex manufacturing techniques needed to mass program a ROM, it is normally only used if the program is going to be sold in large quantities - 10000 or more of a Popular game is not unusual. The larger the quantity of exactly the same chip, the lower the cost to the user but unfortunately in this context, the user is the game manufacturer and not us.
If the game is new and rushed onto the market, the cartridge may use EPROMs instead of ROMs which means that they are Erasable Programmable Read Only
Memories. They are still only read by the computer but if they are removed and put into a special EPROM programmer which uses a high voltage - about 24 volts - to pulse the appropriate
pins on the chip, other programs can be put on them. Before programming
EPROMs, you must first erase them using Ultra Violet light from a special type of lamp. EPROMs can be easily recognised inside a cartridge because they have a quartz glass lid on top of the chip.
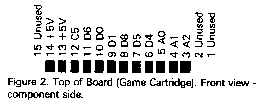
The cartridges used in the Atari have space and the sockets for two 24 pin ROMs or EPROMs although some games only need one chip. Figures 1 and 2
give the edge connections for the printed circuit board inside the
cartridge. This is a double sided PCB and the component side is identified by
num bers with the soldered side identified by letters.


AN EXPANSION SLOT?
After the initial interest in playing games, I am sure that many people think about connecting things to their Atari computers but are put off because it does not have an expansion slot like the Apple. Fear not, it does, but this must be Atari's best kept secret!. There is a 56 way edge connector buried inside
all that metalwork. It carries the guise of a test connector, but is quite capable of supplying all your needs as figures 3 and 4 will show.

WHAT'S INSIDE?
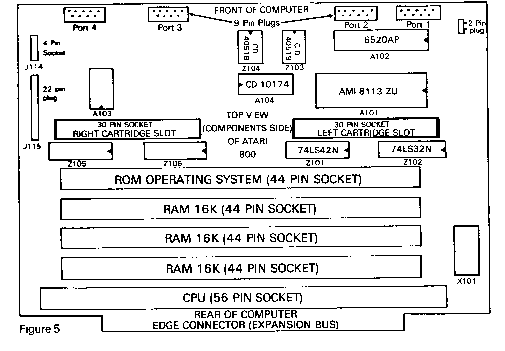
Atari have never published anything showing the parts layout of the 800. Because of this many people are wary of poking about inside the computer and there are therefore a pitiful number of bolt on goodies available from or for hobbyists. A few isolated manufacturers now sell some plug in devices but this is usually no help at all in catering for individual requirements. The answer is to build your own electronic bits and pieces and to help you attach them to your Atari, Figure 5 presents details of the world under that plastic cover.
KEEP IT QUIET!
Ever had a great idea for a program late at night but have been worried about waking everybody up because of the bleeps and squawks coming from the computer? Try the following modification and you will not even wake the cat!
It is easy to turn down the sound on the TV, but what about that internal speaker? It is useful to
know that each key press has been accepted but many people appear to be unhappy with those loud bleeps that accompany loading and saving of programs. So far
I have not been able to eliminate the loading and saving bleeps whilst retaining the key clicks but it is a relatively easy matter to disconnect the internal speaker. Simply remove the cover and pull out the 2 pin socket situated on the left hand side of the keyboard. Nice and quiet now but how can you tell that a key has been pressed or that the computer is ready for loading or saving? The answer is to fit a small LED and a 1000ohm (1 Kohm) resistor connected in series to the plug which originally had the speaker attached. A small hole is drilled in the front of the computer case where
it can be easily seen. This LED will now flash with every key press and whilst loading and saving. If you find that the room lighting or daylight is too bright to see the LED clearly, then you can reduce the value of the resistor to 680ohm or 560ohm.
Coming in future issues - I/0 port connections, an idea for a
multi-ROM box, connecting headphones plus other ideas.

top