EVERYTHING YOU WANTED TO KNOW ABOUT YOUR ATARI
BUT WERE AFRAID TO ASK (PART 3)
HEADPHONES
Ever thought about
monitoring the sound produced by your computer on headphones? This is
okay if you have a TV with a headphone socket but it is not really hi-fi
because it is usually wired by the manufacturers into the speaker
circuit and any hiss or hum present is more noticeable. So what can you
do to improve quality or if you do not have a TV with a headphone
socket? Firstly you can forget any ideas you might have of adding a
socket to a TV which was not designed to have one. Definitely not on.
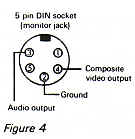
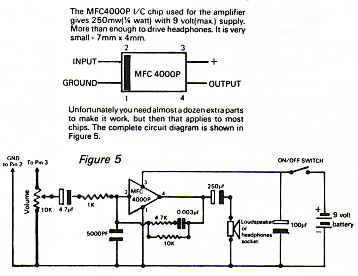
You have a choice of simply connecting a small amplifier to the audio
output of the computer externally and letting this drive your headphones
as shown in Figure 4 or fit a small special purpose amplifier inside the
computer with a socket for headphones fitted in a convenient position.
The latter is of course the neatest solution but requires more work and
involves drilling holes and soldering. The choice is yours.
To prevent any problems
with possible leaky batteries it is suggested that batteries are not put
inside the computer. Possibly a plug and socket arrangement at the rear
or a separate low voltage power supply unit driven from the mains. Such
a project is for experienced constructors only though.
SERIAL I/O PORT
One of the lesser known
parts of the Atari is the peripheral connector at the side into which
your 410 or other peripherals plug. It is a 13 pin Molex plug, part
number MX 7514-4.13 - a non-standard plug if ever I saw one! A pity
Atari did not put on a nice standard D-type connector.
Not only is the number of
pins non-standard, the diameter and spacing is also different so any
ideas you may have about cutting down a 15-way D-type socket simply will
not work, I have tried it. If you want to plug anything in to this
socket you have a problem. I have not yet been able to find a supplier
in the U.K. for the socket to fit the 13-way I/O plugs but you can buy
these sockets with any length of shielded (screened) cable attached from
Elite Digital, P.O. Box 1414, Melville, New York 11747. For those of you
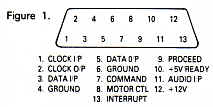
who are interested in trying expansions through the I/O port details of
the connections are given in Figure 1.
A ROM EXPANSION BOX
The advantage of games
cartridges is that they instant load, however you still have to open the
lid to change cartridges. With tape or disk it is possible to load a
particular game by typing in its name and the computer will search the
tape or disk for the program required. It would be nice to select
cartridges in this way but of course you can only have one cartridge
inserted at a time. Even on the 800 the second slot is of no use in this
connection.
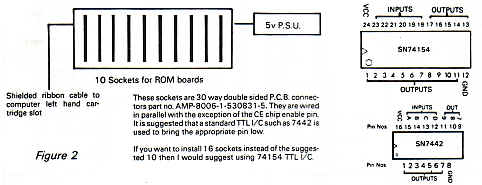
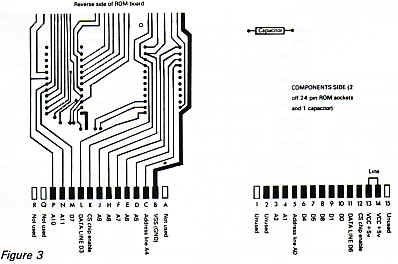
The solution is, I think,
to have a separate box containing its own low voltage power unit and say
10 sockets wired in parallel, except for the CS pins which are
individually wired. A multiway ribbon cable is then fitted with a
suitable connector and plugs into the left hand ROM socket of the computer.
It should be possible for someone to write a short program and with the
aid of an EPROM burner put it on ROM which would be put in slot 1 of the
expansion box. This ROM would contain a menu. The BASIC cartridge would
be put into slot 2 with various other games or languages taking up the
remaining slots. The Menu program would ask which of the available
cartridges you wished to load and exiting a program by using SYSTEM
RESET would bring you back to the Menu for a new selection. I thought of
this idea about six months ago and keep meaning to try it out but
available time does not permit. On this occasion perhaps I can pass the
idea over to PAGE 6 readers and maybe one of you could come up with a
finished product or prototype. Figures 2 and 3 give a little more
information to get you started.
top