How about trying something for your disk based system
which requires no programming knowledge whatsoever? Make yourself a disk
box! Phil Brown sent in one he had made and it really is an excellent
and sturdy storage box.
Since purchasing a disk drive I have been amazed at
how fast one's disk collection grows and quite soon it becomes a problem
to store them. A disk box is the obvious answer but with disks
themselves being quite pricey, I did not wish to spend too much on
storage. Looking through the catalogues revealed prices between £17 and
£30 so I set about making my own and spending the balance on more
disks! I have been so pleased with the results that I would like to
share the idea with other readers, that is if you are interested in
three disk boxes for less than £1!
The box is made of card, is dustproof, anti-static and holds the
disks upright with room to flick through for selection. It was designed
to hold 20 to 22 disks with room for dividers. The card used came from a
local art shop and is DALER ART BOARD which is available in several
colours. One sheet will cost you about 80p and will make three storage
boxes as detailed here. The only other cost is a tube of glue and your
time but spread it out over a few days and you will still have plenty of
time on the computer.

ASSEMBLY
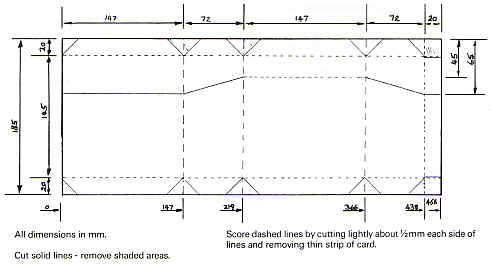
1. Cut main box piece and draw, on the reverse, all bold and dashed
lines. 2. Cut out the shaded triangular shaped pieces from the main box.
3. Score top and bottom 20mm flaps by cutting 1/3
way through the card 1/2mm to 1 mm each side of the dashed
lines and remove the strip of board.
4. Score main folds and ensure everything folds fairly
easily with the scored lines on the inside. If it doesn't fold easily
scrape some card out of the scored lines.
5. Cut the solid lines which separate the lid from the
base and score, sparingly, the hinge line.
6. Using a wide black felt tip marker, colour the
edges of the card which will improve the final appearance.
7. Gently ease the box into a rectangular tube and
glue the sides together with a PVA glue such as Evostick W and use
clothes pegs to hold for an hour or so.
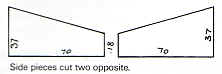
8. Cut out base plate and top plate, inside side pieces
and front inside lip.
9. Check the base plate fits inside the bottom
of
the box You will probably need to nick off the corners and cut a sliver
off one edge at the corner to fit against the box seam. Glue the base
plate from the inside, i.e. with the flaps sitting on your work surface.
Put weights inside to hold the base until it is set. Make sure first
that it is square.
10. Fit side internal edges so that they protrude approx
10mm above the sides of the box and hold in place with pegs. These side
pieces must touch front and back because they stop you squeezing the box
when it is in use.
11. Fit front inside lip to line up with the side
pieces, gluing each end to the side pieces. Put aside until dry.
12. The top of the lid is left until last to ensure
that the top closes square. Close the box and glue the top on to the
folded lid flaps and put a weight on top until dry.
Put the box somewhere warm for 24 hours to fully dry
out and then you can decorate it with your favourite stickers! The box
will stay shut but you can secure it with an elastic band if you take it
out with you.
You will now need some disks to put inside and you can buy these with
the £25 you have saved from buying a commercial disk box!
top
