One of the most appealing and powerful features of a
home computer is the ability to move shapes around the screen -
animation. Atari owners have at their finger tips a superb graphics
machine with many powerful features. Some are more difficult to
understand but even a complete beginner can obtain some very pleasing
results by character set manipulation.
You have already used the character set. It consists
of the letters and numbers and control characters that you see when
you type anything from the keyboard. Each character is made up of
eight lines and each line is eight bits wide, so every character is
made up of an 8 x 8 grid. If you typed the letter T and could magnify
the screen you would see the squares illuminated as in figure 1.
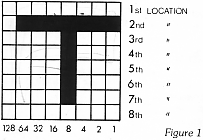
Each character is made up of a box containing 64
squares. All or none or any combination of these squares can be filled
in to make a shape. If we filled them all in, we would get a solid
square box. If we left them all empty we would get a blank space. If
you look again at figure 1 you will see the figures 128 to 1 along the
bottom. Without getting too technical, these are the decimal codes for
each bit value. So, how do we use these to create a shape?
First we draw our shape onto an 8 x 8 grid until it looks about right.
Lets start with a primitive looking space ship. Take a look at Figure
2.

If you look along the first line, or location, there
are two squares filled in, one in the '64' column and one in the `2'
column. If you add these together (64+2=66) and then POKE the result
into the first location of a character, the computer will know which
squares to fill in. Continue doing this until each of the eight lines
have been added up. We now have all the information to store a
character in a DATA statement which would look like this
DATA 66,36,126,223,60,0,0,0
Let's recap. It takes eight memory locations to
store the data or information for one character so all we have to do
is store different numbers and 'Hey-Presto!', we have a new re-defined
character. Well, almost but not quite!
The character set is stored in ROM (Read Only
Memory) which we can't change so our first task is to copy the
character set to a location in RAM (Random Access Memory) where we can
change it in whatever way we wish. Now we come to a problem which you
may not have dealt with before, memory management. You have to decide
where to store the character set we are going to copy from ROM. A full
character set requires 1024 locations since there are 128 characters
and each requires 8 locations (128 x 8 = 1024 or 1k), so we need to
set aside an area of memory for this purpose. Memory is divided into
'page's, each of which is 256 bytes, or locations, long. We have to
find a suitable page number and we will then POKE this number into the
Character Base Register (location 756) which tells the computer where
the character set to be used is stored. If you now take a look at the
program, you will see that lines 10, 50 and 150 have the number 120
which is the page number we have chosen to store our new character
set. If you have a 16k machine you will have to use a lower number
such as 48 but whatever number you use it must appear on ALL three
lines. Before going any further make sure that you understand what you
have read so far. How to draw your own characters and change them into
numbers that the computer can understand. If you have an idea of the
principles involved, then continue, but if you are unsure go back and
read it again. Although it is a lengthy process, the principles are
fairly simple.
You will now need a chart to show you the order in
which characters are stored in the character set. As the chart is
quite lengthy we do not have room to reproduce it here but the
references at the end of the article will give you further
information. If you want to make up your own chart you can use Listing
2.
Look at line 20 of Listing 1 and you will see that I
have assigned a value of 64 to X. This is changed from 64 through
to 71 with the loop in line 30, so I am changing characters 64 to 71
of the character set which are the first 8 CONTROL characters. You are
not restricted to these as you can choose any or all of the 128
characters, just specify the character number in line 50 (the value of
X). Be warned though, if you change any letters or numbers, you cannot
use those letters or numbers on the screen. If for example you had
re-defined the letter A to a space ship and then wanted to print
ATTACK, you would get little space ships instead of the A's!. It is
best to stick to re-defining little used characters to allow mixing of
text and your own characters on screen.
Listing 1 shows how to POKE your new DATA into the
character set so study it well before we go on to try some animation.
Got it? Right now let's see how we can do some animation.
We can quite easily move any of the standard
characters around. We could even make the letter A do triple
somersaults, but it doesn't look that good so what I've done in
Listing 1 is to use two characters to make a larger one. The DATA in
line 70 changes the CTRL-COMMA character into the left side of a bird
and the DATA in line 80 changes CTRL-A into the right hand side. Now
if you PRINT them side by side, you will get a bird which is actually
two characters wide. You can see that by using this method any number
of intricate shapes can be designed, with each character being part of
a larger shape. You are restricted only by your own imagination.
If the shapes are going to be static, for example
trees, buildings etc, you can use as many characters as you like, but
if you are going to move shapes around, spaceships, monsters etc, then
it is best to stick to between 1 and 6 characters as the more
characters there are to move, the slower the object will move about.
One character will move quite fast but a monster made up of 8
characters will be rather sluggish. Going back to the program, lines
90 to 140 each alter the shape of the bird slightly and when printed
alternately give quite a good impression of flight. Lines 160 to 230
move the bird by PRINTing the first two characters, then erasing them
and then printing the next two one space further on. These lines could
quite easily be converted to work with a joystick. Line 1000 is just
there to provide a little sound.
There are many refinements to character set
animation such as protecting your character set and using other
Graphics modes but you now have the basics, so fill the screen and
have some fun!
References:
Internal Character Charts
ATARI
BASIC Reference Manual. Page 55
YOUR
ATARI COMPUTER (Osborne/McGraw Hill). Pages 294 & 417
COMPUTE!'s
THIRD BOOK OF ATARI (the most comprehensive reference).
Redefining and Animating Characters
COMPUTE's
FIRST BOOK OF ATARI GRAPHICS
COMPUTE!'s
SECOND BOOK OF ATARI GRAPHICS
Listing
1
|
|
|
 |
Listing 2
|
|
|
|
top