A tutorial on Antic modes 4 and 5
Most owners have heard of Atari's ability to
re-define characters even if they are not sure how it is done.
Character graphics are a quick, versatile and memory efficient way of
developing game playfields and simple animation. In this article I
will show you how to use two of the least understood of the text or
character modes.
One problem with using character graphics is that
the best looking characters are only available in Graphics 0, which
only allows one colour. In Graphics 1, characters can be any one of
four colours, but the loss of resolution makes them look rather
chunky. What would be most useful would be a graphics mode with the
resolution of Graphics 0 but with more than one colour available,
preferably without using extra memory. It would be even better if the
characters themselves could be made up of more than one colour. Well,
believe it or not just such a mode is available on the Atari. It is
known as Antic 4 or on the XL and XE machines as Graphics 12. Antic 5
(Graphics 13) is a similar mode but with less resolution. These modes
are used extensively in commercial games, but for some reason tend to
be less used by the ordinary Atari user. I suspect that this is partly
due to lack of awareness of the existence of these modes and partly
due to the need for a little extra programming in order to use them.
Why Antic 4 and 5? As many of you know, Antic is the
chip inside the Atari directly responsible for producing the display
on the TV screen. It recognises 14 different graphics modes (numbered
2-15 by Antic) plus the three GTIA modes, but unfortunately not all of
these modes are directly available from BASIC, at least in the
400/800. I understand that all but one of these modes can be called
from BASIC in the XL models, however all the programs in this article
should work equally well on both XL, XE and older machines. Antic 4
and 5 can therefore be termed as two of the `hidden' modes The other
three are Antic 3, 12, and 14 and would perhaps be a suitable subject
for another article.
How then do we get into these modes? Antic is told
how to display data on the screen by means of a set of instructions
called the Display List. This isn't intended to be an article on
display lists as such (yet another article!) so suffice it to say that
to use Antic 4 or 5 we must either set up our own Display List or
modify an existing one. (XL or XE users can simply use a Graphics 12
or 13 statement).
Antic 4 is similar to Graphics 0 in screen format
and memory requirement so to use it we merely change the existing
Display List. We can find the start of the list easily enough by
PEEKing memory locations 560 and 561.
Listing 1
|
|
|
 |
Listing 2
|
|
|
|
Listing 3
|
|
|
|
Without
further ado therefore, type in and run Listing 1.
Notice that
the default background colour to Antic 4 is black. Notice also that
you can't read the characters! Why this should be so we will discuss
later. In all other respects Antic 4 is treated as Graphics 0 by the
Operating System and all of the screen editing and cursor control
features will work normally. You will stay in this mode until you do
another Graphics call or press System Reset.
Antic 5 is a little more difficult The problem is that there is no
other mode available with equivalent resolution. Graphics 1 has 20 x
20 resolution giving double width characters, plus a text window,
while Graphics 2 has 20 x 10 resolution giving double width, double
height characters. Antic 5 however has 40 x 10 resolution (normal
width, double height characters), assuming a text window is added. The
easiest solution is to construct your own Display List and place it in
a protected area of memory such as page six. To do this, type in and
run Listing 2.
A brief word
concerning this program may be helpful. Line 10 reads the data for the
new Display List and POKES it into page six of memory. The only data
we don't have is the starting location of screen memory and of the
text window memory, and this is represented by the zeroes in line 100.
Graphics 1 needs the same amount of memory as Antic 5 (even though the
screen format is different) and calling Graphics 1 in line 20
automatically allocates the correct amount of RAM. Locations 88 and 89
point to the start of screen RAM and 660 and 661 point to the start of
text window memory. The values in these locations are then POKEd into
the appropriate places on page six. Line 30 redirects the Display List
pointer to our new list. One further problem is that although we know
that 40 characters can be printed per row, the Operating System thinks
it is in Graphics 1 (from line 20) and will only allow 20 characters
to be printed per line. We can trick the computer into thinking it is
in Graphics 0 (40 characters per row) by POKEing 87 with zero, which
allows us to use this mode fully. Having opened channel 6 to the
screen by the Graphics call in line 20, we must use this channel to
print onto the Antic 5 part of the screen. One final snag to watch for
here - only 10 rows are available for printing (not counting the text
window) but the OS, thinking it is in Graphics 0, will allow you to
print up to 24 rows without returning Error 141 - cursor out of range.
Attempting to print outside of this 10 row limit may cause
interference with the OS RAM below screen memory, causing a program
crash.
Let us return to why the text is not readable in these two modes. As
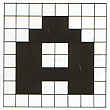
you know Atari characters are constructed on a grid of 8 x 8 pixels.
Each pixel can either be 'on' or 'off' (i.e. lit or unlit), so that
the letter 'A' for example would be made up like this:
In Antic 4/5 however, each character is constructed on a 4 x 8 grid,
with each pixel being twice as wide as a Graphics 0 pixel
(technically, one colour clock wide). Either half of the pixel may be
lit independently of the other, so that the pixel may also determine
colour. The pixel configurations and the colour registers used are
shown in Table 1.
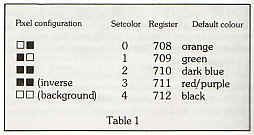
Using this chart, you should be able to define your characters in any
desired colour or combination of colours. If you look at the above
diagram of 'A' in this light, you will see that although retaining the
shape of the letter, the character is in a mixture of different
colours, making it difficult to read. Antic 4/5 characters must be
designed to take this into account. The letter 'A' in Antic 4/5,
Setcolor 0, should look like this for example:
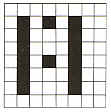
In order to use other colour registers it would of course be necessary
to define the letter in a different fashion.
One problem with re-defining characters is that they will no longer be
readable in Graphics 0. This is unfortunate if your programs use
on-screen prompts or user inputs that you want to be readable.
However, we can change the characters back to the original set in
mid-screen by using a Display List Interrupt. Listing 3 is an example
of character re-definition and a Display List Interrupt to set up
Antic 4 with four lines of Graphics 0 at the bottom of the screen. It
re-defines the characters A, a, and Control-A as upper case 'A' in
three colours, and then prints them and their inverse video
counterparts to the Antic 4 screen. It also prints them to the
Graphics 0 window to show the use of the DLL.
The DLI also restores the default background, border, and character
luminance colours so that you can alter the colour registers as much
as you like without making the text unreadable. The DLI itself and the
machine code routine to move the old character set into RAM are kept
as separate subroutines for use in your own programs.
Note that the screen does not have a true text window. Anything
printed here will normally scroll into the rest of the screen with
further inputs or prompts but line 100 prevents this. To see the
effect, press BREAK and then RETURN several times.
Listing 4
|
|
|
|
Listing 5
|
|
|
|
The program
will need to be changed for Antic 5. Substitute the lines in Listing 4
for their counterparts in Listing 3.
Two points
to note. Firstly, the characters don't look as good as they do in
Graphics 0, because we are defining them with less resolution (4 x 8
as opposed to 8 x 8 pixels). Secondly, note the curious way in which
inverse video is treated. Those pixels used with only one half of the
pixel lit are unaffected, but those with both halves lit (using
Setcolor 2) change colour (to Setcolor 3) in inverse video. This gives
us four colours on screen, but only three in any one character.
So far, I have made no mention of the best feature of these modes -
the ability to use characters consisting of up to three colours. For a
brief example, substitute the lines in Listing 5 for their
counterparts in Listing 3. You should see each letter 'A' appear in
two colours.
I appreciate that 'A' in two colours is not the most exciting thing
you've ever seen, but bear with me a moment. Of course, if you want
full multicolour text on your Atari, you will have to redesign all the
characters. I will leave this for you, but note two things. Firstly,
you will lose some of your character set - whichever you choose to
redesign. In the above example, we lost the lower case and Control-A
characters. Secondly, design is greatly helped by a character
generator utility which supports Antic 4/5, my own personal favourite
is 'Magic Window' from Quicksilva. The best of the public-domain
programs is probably 'Create-a-Font' published in Analog magazine
(February 1984 issue). Compute! magazine published a very useful
utility called 'Antic Aerobics' in October 1983 specifically for the
creation of pictures using groups of multicoloured characters.
Listing 6
|
|
|
|
Listing 6 is a subroutine intended for insertion into Listing 3 above.
The characters were created with 'Antic Aerobics' and if you can be
bothered to type in all that data you will get a better idea of
exactly what can be achieved in these modes.
Not only do Antic modes 4 and 5 allow you to create superb displays
they give you the versatility of character graphics (including
animation) and considerable memory savings. Consider for example that
whilst Antic 5 pixels are the same size as those in Graphics 7, Antic
5 requires only 0.5K memory while Graphics 7 uses nearly 4K.
I hope this article has started you thinking about the 'hidden' Atari
graphics modes and I look forward to seeing more programs appear in
PAGE 6 using them.
top