DISK ONLY
If you found Munchy Madness (Issue 24) too easy or
too hard, or have completed all the screens, then worry no more for
the Munchy Madness Screen Designer will let you design your own
screens ranging from the ridiculously easy to the impossibly hard!
Don't worry, the Screen Designer is simple to use, requiring just a
joystick and a little time. I wish that I had written it before
designing the original screens!
GET DESIGNING
Type in the main program, check it as you go with
TYPO 3 and SAVE a copy to disk. RUN the program and away you go.
There are three main menus shown on the screen. You
may select any item of these by moving the joystick up or down, left
or right to highlight your choice. Pressing the joystick button will
then put you in the mode selected. If you want to return to the main
menu at any time, simply press any key. This works on any selection
except Load and Save where you should press RETURN to abort.
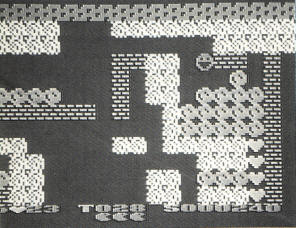
DRAW MENU
This allows various objects to be drawn on the screen
by simply selecting them, moving the cursor to the desired position
and pressing the trigger. You select the item you wish to use by
placing the cursor on it and pressing the trigger. This will present
you with the screen you are designing and allow you to plot.
Pressing any key will return you to the main menu to select another
item. The elements you can use are as follows.
Space — spaces can be positioned anywhere on
the screen except at the edges. If you wish to 'unplot' any
character simply use a space to overwrite it.
Land — may be positioned anywhere except at
the edges.
Wall — You may have a wall anywhere you wish except over the
players start position or the exit position.
Edge — the same rules apply as with Walls.
Heart — may be positioned anywhere on the
screen except at the edges or over a players start or the exit
position. There must be at least one heart on each screen up to a
maximum of 99 and you must ensure that the number of hearts is the
same as, or more than, the Number selected in the Set menu.
Boulders — can be anywhere, subject to the
same rules as Walls.
One final point to note is that the total number of
hearts and boulders combined must not exceed 256.
SET MENU
This
allows various parameters of the screen to be altered. Coupled with
the DRAW facilities this allows an almost infinite number of screens
to be designed. Numeric parameters are selected by moving the
joystick up and down to increase the value and by moving left or
right to select other digits. Press the trigger when you have
finished.
Start — allows the player's start position to be set by
positioning the cursor and then pressing the trigger. Note that the
start can only be positioned in the top left area of the screen and
can only be positioned over spaces or land. The default start
position is 1,1.
Exit — can be set anywhere on the
screen (except over a heart or boulder) by positioning the cursor
and pressing the trigger. The default exit position is 2,2.
Colours — may be altered to
whatever you wish. After selecting a colour register (0 — 5) the
characters used in the screens will be displayed and the colour can
be altered by moving the joystick up or down to alter the hue or
left and right to alter luminance. Press the trigger when finished.
Time — allows you to set the time
in which a particular screen must be completed. This, coupled with
the amount of detail on screen will determine the difficulty level
of your screens. The default time is 100 but any time between 40 and
999 may be chosen.
Number — is the number of hearts
needed to complete the screen. You must have the same number, or
more, hearts otherwise you cannot complete the screen. For an easier
screen ensure that you have more hearts on screen than the number
used here.
SCREEN MENU
This is where all your hard work can be
saved or loaded or where you can scrap it all and start again!
Clear — resets the current
screen. To be safe you will be prompted to confirm your decision.
Move the joystick in any direction to alter the response and press
the trigger when ready.
Load — will allow you to load a
previously saved screen to continue working on it. Simply enter the
correct filename when prompted. If you wish to abort, press RETURN
without typing a filename.
Save — allows the current screen
to be saved to disk. If there are any errors in the design of the
screen they will be reported and the save aborted. When prompted to
enter a filename, you may return to the main menu by pressing RETURN
without typing a filename.
MAKING A NEW PROGRAM
Once your new screens have been designed
and saved to disk, it is time to combine them with your original
Munchy Madness object code program. Note that it is the program
created by running the Munchy Madness listing from issue 27
that you must use and not the BASIC listing itself. The Munchy
Madness Joiner program does it all for you, quickly and simply.
THE JOINER PROGRAM
Once you have typed, checked and
saved listing 2, and designed and saved your screens, just follow
the steps shown. You don't have to use a new disk but it is probably
wiser until you get used to the procedure.
1. Copy your original Munchy
Madness object code program to a new disk (NOT the original BASIC
listing).
2. Copy the new screen, or screens you have designed to the same
disk. You may have between one and four screens.
3. Load the JOINER program and change the DATA statement in line 22
to that of your OLD Munchy Madness program.
4. Change the DATA statement in line 12 to the NEW filename you wish
to use (Don't use the same name as the old program).
5. For each screen used change the DATA in lines 32, 42, 52 and 62
to the filenames you have used for each of your screens. If you have
only one screen delete lines 42, 52 and 62. With two screens, delete
lines 52 and 62 and if you have only three screens delete line 62.
6. Leave your new disk in drive 1 and RUN the joiner program. A new
Munchy Madness program will be created on your disk with the
filename entered in line 12.
That's it! You can now run the new
Munchy Madness program with your own screens by using Option L of
DOS in the usual way. You can have as many different versions of
Munchy Madness as you wish. Get designing!
Screen Designer Program
|
|
|
 |
Joiner
Program
|
|
|
|
|
SEND IN YOUR SCREENS!
Send in YOUR Munchy Madness screens for
others to enjoy. Maybe we can get together a whole
collection of Munchy Madnesses! For each disk of screens you
send in you can choose any of the PAGE 6 Issue disks or any
of the disks from the PAGE 6 Library in exchange. |
top