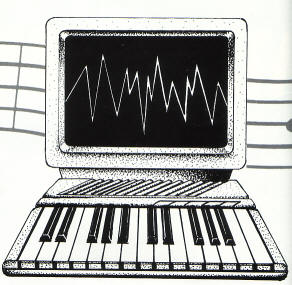
 Bryan
Kennerley will turn your keyboard into a unique sound synthesiser
complete with light show
Bryan
Kennerley will turn your keyboard into a unique sound synthesiser
complete with light show
The sound capabilities of the Atari 8-bits are
seldom held in high repute by any but the most avid Atari freaks,
but surely the fact that a version of the POKEY chip (which is the
heart of Atari sound generation) is responsible for the music on
some top coin-op games, including Gauntlet, means there is a great
deal of potential hidden away somewhere. Hopefully, this program
will help realise some of that potential.
ORIGINAL SYNTH utilises the Atari's 'volume only'
method of sound production. A full explanation of this is given in
the book De Re Atari but here is a brief explanation to help you
understand how the program works. You should be familiar with the
BASIC SOUND command, if not you can look it up in many reference
books or the BASIC manual. One of the parameters that may be set is
'distortion'.
If an odd distortion number is used with zero
pitch and positive volume, a 'click' will be heard. The volume of
the click will be equal to the difference between the previous and
the new volume. For example, if you specify volume 0 and then volume
15, the resultant volume will be 15. If you then specify 15 again,
the resulting volume be 0 (15 – 15). If a great many of these clicks
are produced in succession, a musical tone can be produced. From
BASIC only a low buzz can be produced but when using machine code,
the loop must be slowed down since at full speed only dogs would be
able to hear it! Original Synth makes use of this feature to produce
some very interesting sounds.
THE DISPLAY
When the program is RUN, you are shown a graphical
view of the ADSR. This is how the volume of the note changes as the
note is played. Unless you have changed anything, the volume will
start off at full, decay to half volume, stay at half for a while
and then fade away to silence. This can be altered to produce
special effects but more about that later. Every calibration on the
ADSR display is equal to one second of real time.
If you press 'V', the display will change to show
the current waveform. The waveform controls how the note actually
sounds. For example, brass instruments typically produce a
triangular waveform. This program cannot synthesize an instrument
exactly, however, since the waveform of an instrument varies as the
note is played but it can give an approximation of different types
of instrument.
THE MENU
The lower half of the screen shows a menu of
options. I will explain each option in order:
Sound Type – When this is set to FULL the
ADSR is enabled. When set to PURE the volume remains constant and
the note is purer.
Distortion – When enabled the screen is
still displayed as the notes are played, resulting in a more
fragmented, less musical, tone.
Light Show – When enabled, each note is
accompanied by coloured lines moving up or down the screen.
Configure – If you find that you are using
a certain combination of waveform and ADSR frequently, choose this
option to save the combination to disk. When you next run the
program, that combination will automatically load.
View xxxx – Scrolls between the ADSR and
waveform display.
Edit – Edits either the waveform or ADSR,
depending on which is currently displayed. Note that in editing mode
the cursor is only one Graphics 8 pixel and may be difficult to
locate.
For Waveform Editing, move the flashing
cursor around the screen with joystick 1 or the cursor keys and
alter a point with the fire button or by holding the Return key. To
alter the length of the waveform, position the cursor and hold the
space bar. Shortening the waveform generally makes all notes higher
and lengthening it lowers all notes. This is not always the case
though, since altering the number of peaks present may counteract
this effect.
ADSR Editing takes a different form to the
waveform because there are 512 possible points for the cursor. The
joystick and cursor keys move the cursor 1 point at a time while TAB
and SHIFT + TAB move the cursor 20 points right or left
respectively. Holding the fire button or Return key plots a point
after which the computer joins the points with a line. Up to 64
points can be plotted at any one time. Holding space will delete a
point providing the cursor is on a point previously set. This can be
determined by the Point Set message on screen which will show
whether the point at which the cursor is residing has been set.
I/O – After choosing which type of I/O you
require, you will be presented with a directory of waveforms or
ADSRs as appropriate. Choose which file you want by typing its
number. If you are saving a new file you will be prompted for a
filename. Just type the name and NOT the "D:" or extender. Pressing
the Escape key will abort the operation at any time before the file
number is chosen. Be careful! The program is only protected against
the 'FILE NOT PRESENT' error and no other disk error is accommodated
such as 'DISK FULL'.
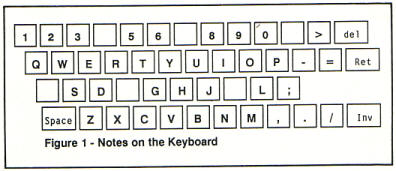
PLAYING MUSIC
This what all that editing is for! Press START to
enter music mode and the computer becomes a 3½ octave piano keyboard
as shown in Figure 1. SPACE is the lowest note and RETURN is the
highest. Z-INV and Q-RET are the 'white' notes while S-; and 1-DEL
are the 'black' notes. Pressing OPTION at any time will return to
the main menu. The notes played by this keyboard will sound
according to how you have set the waveform and ADSR. I have provided
several examples which you can load in from your disk, but you are
free to design as many as you wish!
I have found that playing music with this program
has helped me understand the layout of the piano keyboard and the
intricacies of sound shaping. As an added bonus it has improved my
finger/keyboard coordination and so increased my typing speed and
accuracy considerably. I hope it will bring you enjoyment and
benefit in a similar way.
|
|
|
 |
|
|
|
|
TYPING IT IN
You will need a disk with at least 250 free
sectors and it is recommended that you start with a freshly
formatted disk as this can be used to autoboot Original Synth.
1. Type in listing 1, checking it with TYPO 3, and
save it with the filename D:CREATOR.BAS
2. Type in listing 2, again checking it with TYPO
3, and save it with the filename D:SYNTH.BAS.
3. Ensure that your disk remains in drive 1 and is
not write protected and then load and RUN D:CREATOR.BAS. This will
create an AUTORUN.SYS and several other DATA and support files (13
in all) and then will the run SYNTH.BAS
4. CREATOR.BAS need only be RUN once, after which
you may either auto-boot the disk or type RUN "D:SYNTH.BAS" whenever
you wish to use the program.