THE ATARI PERIPHERAL EMULATOR
USERS GUIDE
Friday October 16th, 1998
Steven J Tucker
9731 Sunrise Blvd #M33
North Royalton, Ohio 44133
U.S.A
Written by Steven J Tucker
Copyright (c) 1998 by Steven J Tucker
Friday October 16th, 1998
Steven J Tucker
9731 Sunrise Blvd #M33
North Royalton, Ohio 44133
U.S.A
Written by Steven J Tucker
Copyright (c) 1998 by Steven J Tucker
Distribution of registered versions of this product is a violation of copyright law. You may use the unregistered version of this program for a 30 day free trial period. If after 30 days you wish to continue using APE you MUST purchase it or remove all copies of the software from your system.The author makes no representations or warranties with respect to the contents hereof and specifically disclaims any implied warranties of merchantability or fitness for any particular purpose. Further, the author reserves the right to revise this publication and to make changes from time to time in the content hereof without obligation of the author to notify any person or organization of such revision or changes.
Without my written permission, no version of APE, past or present, may be included on any CDROM or other software compilation that is intended for sale, with or without profit to the seller. The shareware version of APE may not be sold for any amount, except a media charge not to exceed $5 US, without my written permission. The registered version may never be distributed in any form, and any licences received are non-transferable. PROGRAM DISTRIBUTION
Written permission can be obtained only by submitting your request along with your product content listing, and sale price to:
Steven Tucker
9731 Sunrise M-33
North Royalton, Ohio 44133
The shareware version of APE may continue to be freely distributed between private parties without charge (including personal web pages), and by online archives and BBS systems, without charge.
APE is an advanced serial application capable of emulating an entire subsystem of devices on the Atari 8 Bit SIO bus.
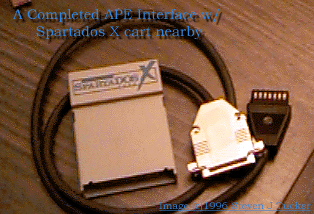 APE talks to the SIO bus of your Atari 8 bit home computer using
the Ape Interface Cable (or SIO2PC cable). This serial device provides
the hardware required to convert the voltage levels present on
the Atari SIO bus to levels compatible with the PC serial port.
This device hooks directly to the SIO port of your atari computer,
and to the serial port of your PC compatible computer. No
interface or other additional hardware is required!
 Plans for building this device yourself are found at the end of this document. The 2
chip version requires $20-25 of parts, some not commonly available. The newer one chip
version of this device requires only commonly available parts and can cost between
$10-20, depending again on the cost of parts in your area.
Assembly and testing of this device takes 2-3 hours. If you have no soldering experience I suggest you pick up a book on electronics and practice before attempting final construction.
If you do not wish to make the interface yourself, I can provide a completely assembled and pre-tested serial unit for you. See ORDER.DOC for details, or ORDERING INFORMATION at the end of this document. Also, anyone purchasing the hardware from me will receive a $5 discount on the more robust REGISTERED version of this software.
APE is compiled using 808x compatible instructions, and will run on most any machine from an XT to a Pentium II with a serial port and at least 200k of free DOS memory. A 286+ class machine with a hard drive and disk caching software (Norton Speed Drive, MS Smart Drive, etc) are recommended to get the very best performance. You should have WRITE BEHIND CACHING turned ON when using APE w/ disk cache software.
APE is designed to operate under MSDOS or MSDOS compatible operating systems that allow exclusive control of the system by a single task . APE requires very precise timing for its serial core functions, and may fail to function if operated under 'time sharing' operating systems such as Desqview, Windows 95, etc. Some users however have reported success under these operating systems with high end pentium class machines.
This is not a shortcoming in APE. The Atari SIO bus was designed to talk to devices that were always ready to respond, and to respond within a strict time frame. When you system takes time away from APE for other applications, the time critical handshaking operations between APE and your Atari become desynced, and IO operations may fail.
Even systems like Windows 95, which claim to give 'idle sensitive' control of the system to DOS applications can still fail. This is because the OS layer of these applications continues to slice time away from APE for its own housekeeping functions.
If you wish to try running APE under Windows95, first run APE under a clean dos boot to see it work properly. After seeing how it should work, you will have better luck evaluating your success under windows.
To boot to a real dos session with Win95 installed, press F8 BEFORE your system boots and select Command Prompt Only. When you do try running APE in a Win95 dos box, set idle sensitivity under Properties to its lowest setting, and window type to Full Screen.
 APE can also be run under Linux DOSEMU.
Instructions for running APE under dosemu 0.60:
- In the dosemu-60.x/serial directory, edit the file ser_defs.h and change the following values:
- The line #RX_READ_FREQ. Change the value shown to 19L.
- The line #MS_MIN_FREQ. Change the value shown to 19L.
- This will change how often dosemu updates the serial port status registers for your dos box. We need FAST updates.
- In /etc/dosemu.conf, emulate ONLY ONE SERIAL PORT. Comment all the other ports out. If you enable 2 or more ports things get choppy as it takes longer to update the serial registers.
- (Re)compile dosemu and install it, run it, and run APE.
APE should work OK for you. I have /dev/ttyS0 emulated, with 'sillyint' set to off. Setting sillyint to the IRQ of your serial port might yield some improvement if you still have trouble. The higher the priority you give 'dos', the WORSE ape runs. If you set the priority with renice to say '14' then APE runs so good even APE+ 56kbps 3X ultraspeed works.
Basic SIO Commands Supported
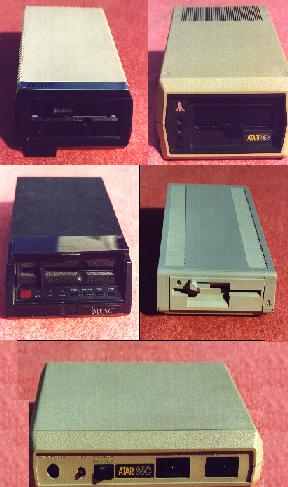
Buying or building this interface, and purchasing the REGISTERED version of APE will be one of the the best investments you can possibly make in your Atari computer.APE is an investment in your Atari 8 bit, securing your data and ability to make use of it for years to come. APE provides extraordinary hardware emulation at a SMALL FRACTION of the cost of real hardware devices!
For less than the price of a SINGLE 'refurbished' 1050 disk drive from one of the few remaining atari 8 bit dealers you will receive all the following:
This enables your disk access to be more than three times as fast as a standard 1050 disk drive using Spartados, Happy Warp Speed Dos, Mydos, and other high speed operating/dos systems and copy programs or just ANY dos using the Happy Warp Speed OS patch.
New!: As of 1.10, Ape fully supports the Ape Warp+ OS Upgrade! You can now experience 3x SIO at all times, under any OS, and even in games! Check out the Ape Warp+ OS InfoPage for information and benchmarks.
Ape does ** NOT ** erase and reuse your PC hard disks, it stores data in 'disk images'. Disk images are regular PC files (like this one) that mimic the size and format of a real Atari disk. They may be as small as 90k, the size of a Single Sided/Single Density 810 disk. And as large 16 megabytes, 65,535 DOUBLE DENSITY SECTORS.
APE also is capable of performing translations of this data on the fly to match the exact specifications of your PC printer!

Transfer files to and from your MSDOS filesystem, including hard drives, CD-ROM's, Floppy Disks, ZIP Drives and MORE using only the Atari DOS
copy function! No other software can offer this
revolutionary new feature!
You can even download small separate executable (EXE) files from the major archives and run them right from the PC Mirror, without even copying them into ATR images!
APE responds to stage 1 calls for the 850 interface R: (modem) handler, making it 100% compatible with terminal programs like BobTerm that use the device independent stage 1 loader!.
Note: Concurrent I/O is the special serial bus mode the atari uses to communicate with the 850 interface, modems and other streaming serial devices.
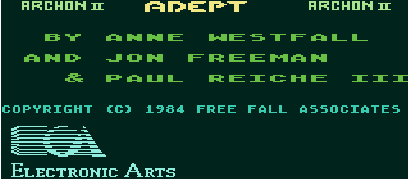
APE can emulate even the most complex copy protection schemes, making the archival of your valuable copy-protected originals possible.
APE can emulate even the most complex forms of floppy disk protection, such as 'Phantom Sector' and 'Fuzzy Sector' schemes.
APEs .PRO format has been able to archive even the most notorious
of the late issue titles, such as: Alternate Reality,
All Electronic Arts titles, Lucasfilm titles, First Star
titles (Spy vs Spy), Broderbund titles, and others.
 The APE ProSystem is included in this distribution. It
allows you to create .PRO images of even the most complex
copy protected disks and use them with APE.
All PHANTOM EMULATION modes are not available to unregistered users. Modes 1,3,4,5,6,7,8, and 9 are reserved for users who support the future development of APE by REGISTERING.
 Reliability. You
will never fear your data being lost to
a bad floppy disk. Your files and data will rest in file
on your PC hard drive, and can be backed up to a more reliable
storage medium such as CD-ROM, tape streamer, etc.
We all know how difficult it can be to find good, working replacement hardware for our atari computers at reasonable prices.
APE is designed to eliminate these worries, providing you with a flexible software system that will continue to grow and become more useful over time as the software is improved and upgraded.
The user supported software concept (also known as "Shareware") is an attempt to provide quality software at low cost.
Both the user and author benefit from this plan. The user will benefit by being able to "test drive" software thoroughly before purchasing it. The author benefits by being able to enter the commercial software market while avoiding the high cost of commercial distribution.
This concept helps many independent authors and small companies that otherwise would be discouraged from developing and promoting their ideas. It can only work with your support. If you obtain a user supported program from a friend and are still using it after a few weeks, then it is obviously worth something to you, and a registration fee should be paid.
This software is distributed under the user supported software concept. Though APE is copyrighted, you are encouraged to copy and distribute the ** UNREGISTERED ** package to others. You may only distribute the unregistered software package in its original unaltered ZIP form.
Please do not steal APE, it is the product of THOUSANDS of hours of coding and debugging. It also represents something quite rare at this time, new software development for the Atari 8.
IF YOU USE APE LONGER THAN 30 DAYS YOU *MUST* REGISTER IT
Unregistered evaluation users have ALL of APEs powerful features at their disposal except the follow, which are available to REGISTERED users only.
Unregistered users may still read AND write at the US DOUBLER Spartados warp speed, and normal SIO speeds. The disk image 453_WARP.ATR is included as a demonstration of Happy 2x Warp SIO in MyDOS, and APE+ 3x SIO in MyDos. No special software or loaders are required to use these enhanced speeds under Spartados.
| APExxx.EXE | The Main APE Executable |
| PROxxx.EXE | The FULL OPERATIONAL APE Pro System! |
| SIGNATR.EXE | Tool to sign & authenticate ATR Archives |
| ORDER.DOC | APE Registration and Order Form |
| APExxx.DOC | The APE Users Manual in ASCII Form |
| PROxxx.DOC | The ProSystem Users Manual |
| APE_F32G.ATR | APE version of the Spartados 3.2g distribution w/ APETIME.COM and REMOTE.COM |
| APE_WARP.ATR | APE version of the Mydos 4.53 distribution w/ APE+ OS Patch and High Speed Sector Copier |
| *.PRO | Any Example .PRO Protected Disk Images |
| *.CAS | Any Example .CAS Digital Cassette Images |
To install APE, change to the directory on your hard disk where you wish to place APE and unzip the ZIP file by typing 'PKUNZIP APExxxD.ZIP'
This will allow APE to function if your computer uses a non standard IRQ/BASE address for its comm ports.
Typing 'APE /?' will give you a listing of command line options:
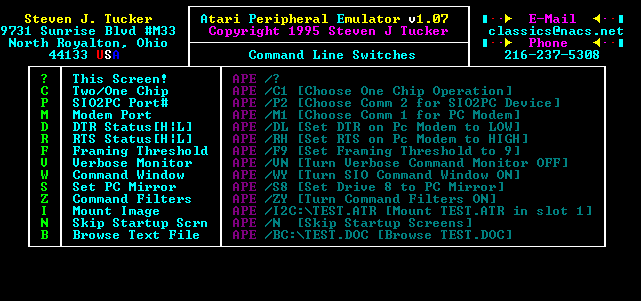
These are all shortcuts for commands available in the main & configuration menus. Their complete functions are covered in detail in those sections.
After processing of any command line options you may have specified the emulator will start. You will then be presented with the status screen.
Use of the '/?' switch will immediately return you to DOS without starting the emulator.
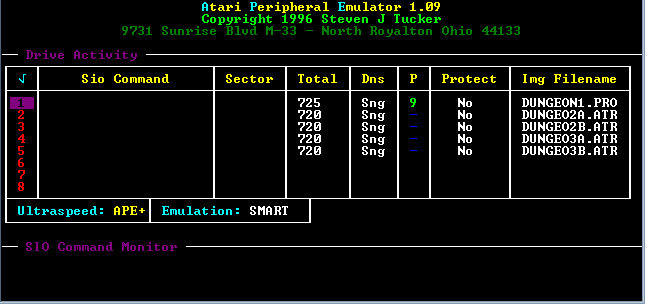
The status line for bay 1 shows you have loaded 'DUNGEON1.PRO' and the following information:
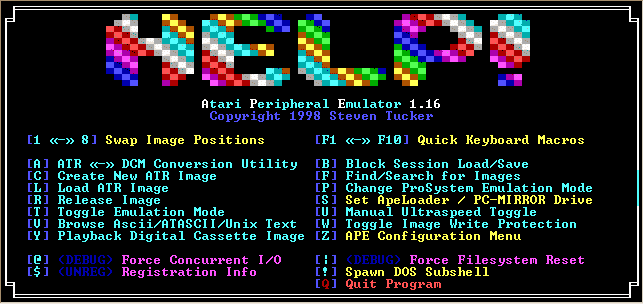
When you select [A], you will be prompted for a filename or filemask for the image to convert. If your specify no filename, a file selector will appear so you can pick a single XFD/DCM image to convert.
If you sucessfully convert an image, you will then be asked if you would like to mount the new ATR image automatically!
If you specify wildcards (i.e. C:\TEL\DOWN\*.DCM) all the files matching your filespec will be coverted in automatic BATCH mode.
To create your own block configuration file, use the 'L' command to load your disk images into the drive configuration you want to save. Then select the 'B' option. You will be asked if you want to Load or Save a block configuration. Press 'S' for save. You can then choose a name for your block configuration, after which it will be saved to disk for future use.
Loading your newly created block configuration is now a breeze! Just press 'B' then 'L' for load, choose your configuration from the menu and all the images you specified previously will be automatically mounted!
As previously explained, your new atari disks are not real floppy disks at all, but MSDOS files that match the storage capacity of the real physical media.
When you press 'C' to create a disk image, you will first be prompted to choose the 'disk size' for your image.
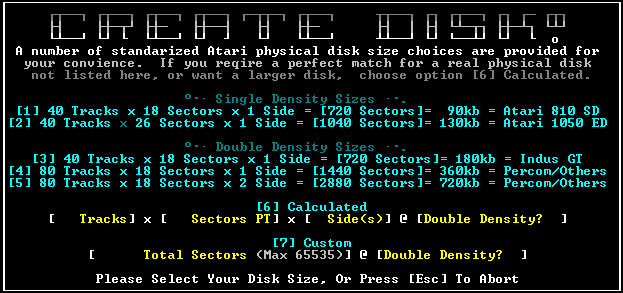
Even though you may want small disk images for copying your real physical disks to (for a perfect size match), you can create disks as large as 16 *MEGABYTES* each!
Using advanced DOS systems like MyDOS and SpartaDOS you can format and utilize disks up to the Atari addressing limit of 16 megabytes (65,535 double density sectors).
If you are using a early dos, such as atari dos 2, 2.5, or other non-enhanced dos you should stick with the smaller sizes until you are more familiar with the creation of images.
Once you have chosen a size for your disk image (choose #1 if this is your first time) we have to pick out a name for your 'disk image' file on your PC.
I recommend you use a filename that describes the contents of the disk image well, such as 'MYDOS.ATR' for your MYDOS master disk, etc.
If you wish to overwrite an existing disk image, you can simply press RETURN at the filename prompt and a file selector box will appear. You may use this file selector to quickly pick the ATR you want to overwrite.
CAUTION: IF YOU OVERWRITE A DISK IMAGE USING THIS FUNCTION IT CAN NEVER BE RECOVERED, USE EXTREME CAUTION WHEN ERASING OLD DISK IMAGES! IF IN DOUBT CHOOSE A UNIQUE NAME FOR YOUR DISK.
Once you have selected a filename you will be prompted one last time for final confirmation. You will also be shown various information about the image that will be created, such as real msdos file size, if the file exists, and its full pathname.
Pressing 'Yes' when prompted will begin the creation of the disk image.
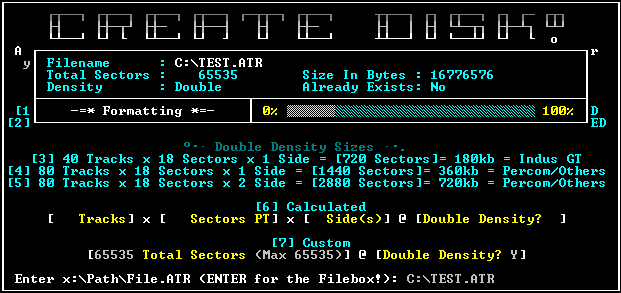
Small disk images are created very quickly, where as very very large disk images such as 16 megabytes can take a few minutes (though this is rare, it takes 15 seconds on my 486/100). Installing a disk cache with 'write caching' activated will greatly increase the speed of this function, and also improve the performance of the emulator greatly.
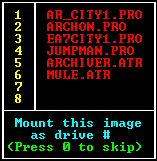 Once successfully created you will be asked if you wish to mount the image you just created. A great time saver over having to manually load the image after creation.
Note also that a newly created 'disk image' is the same as a blank diskette you would bring home from the supply shop. Its totally blank and must be 'formatted' using your favorite atari DOS before it can be used.
If you disk is a standard size, such as 720 sectors & single density it can be formatted with any standard atari DOS. If you are using Atari DOS 2.0, you may only use disks of 720 sectors/single density. Atari DOS 2.0 is rather stupid, and refuses to believe that any other size disk might exist.
If you are using dos 2.5, you may create images of 1040 single density sectors (called ENHANCED DENSITY) You may then format them with Dos 2.5's 'I' command.
To make use of VERY large disks (virtual atari hard drives you might say :) you will need an advanced DOS system such as SpartaDOS or MyDOS. I recommend if you use your atari more than very infrequently that you get one of the DOSes. They are not only capable of using standard sizes (720, 1040, etc sectors), they can manage images of ANY size up to 16 megabytes.
Both of these fine products are SHAREWARE, and can be downloaded from gopher://gopherblue.umich.edu in the Software Archives/Atari/8Bit/Os directory. If you use them please register them. MyDos 4.53 is included in this APE distribution on the disk image Warp_453.Atr
Lets assume you created the grand daddy of disk images, the 16 meg monster :) Formatting procedures for both DOS systems are as follows:
Boot MYDOS and mount your mega disk image in bay 2. APE will show the image as having 65535 DD sectors.
Choose option 'O' from the Mydos main menu, configure drive. We need to tell MYDOS that the disk in 'drive' one is bigger than your average disk (heh).
Steps for getting MyDos ready for a LARGE disk image
You should now be back at the main menu. Notice at the top of the screen that it says '2H'. Mydos now understands drive 2 is a high capacity drive.
We now need to FORMAT the 'disk' to make it ready for DOS use. Press 'I' at the MYDOS main menu and format the disk (do not use the ENHANCED density option).
To verify the disk was formatted Ok press '2' at the MYDOS main menu for a listing of files on drive 2. It should read well over 65,000 free sectors.
Now choose option 'H' and write the MYDOS disk operating system to your image. Once completed you are ready to boot off your virtual hard drive! Yeah!
FORMATTING WITH SPARTADOS 3.2g
Boot SpartaDOS and mount your mega disk image in bay 3. APE will show the image as having 65535 DD sectors.
Spartados is a modular DOS system, its utility functions stored in separate executable files on the main system disk. To initialize a disk image this large, you will require the Spartados utility 'HDINIT' (Hard Disk Init)
Run HDINIT. It will ask you which hard disk you want to initialize, 3 or 4. The program apparently only thinks disks this big would be on those drive numbers, so for now its important your image be loaded in bay 3. (or 4)
It will ask you if you're sure, and once confirmed will proceed to format and write the SpartaDOS FAT to your disk image.
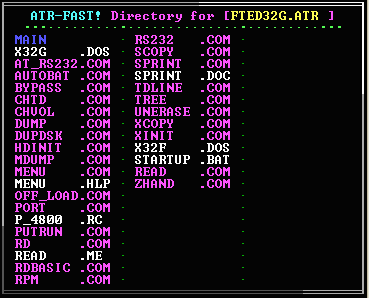
Now that the basic format of the disk has been established, you need to copy a dos file to the image so it can be booted directly. Copy your favorite Spartados DOS file (the *.DOS file, like X32G.DOS) from an existing disk (or disk image) to your new image.
Type 'BOOT X32G.DOS' where X32G.DOS is replaced by the name of the DOS file you just copied onto the disk. Spartados will now configure the boot sectors of your hard disk image to self boot using the new DOS file!
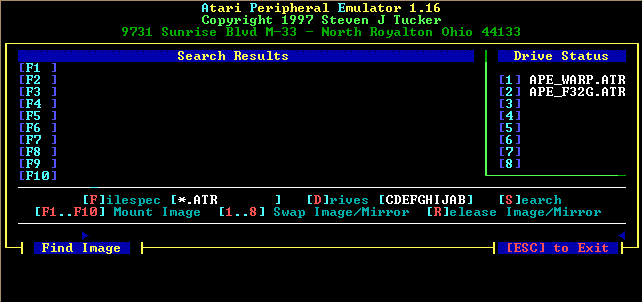
The find image command will allow you to search any set of drives specified, including CDROM drives, floppy drives, etc.
To specify which drives to search, use command [D]rives, and edit the drive listing.
To speficy which files to search for, use the [F]ilespec command, and edit the search filespec.
To start a search, just press [F]ind, and APE will start a quick search for up to 10 images that match your request.
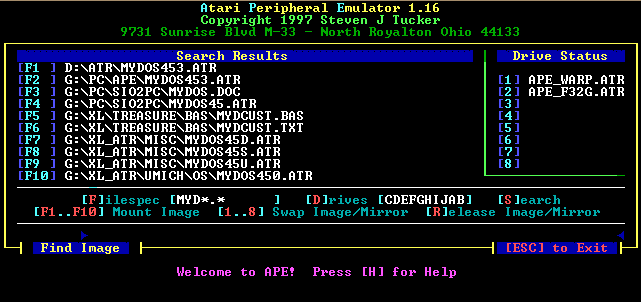
The screen above displays the results of a search for MyDOS related images, using the search filespec "MYD*.*" across drives A-G.
As shown above, oncce you have the results of your search, loading the images into APE is easy!
Just press [F1 - F10] to select the image you want to mount, and press [1 - 8] to select the APE bay you want to mount the image in!
You can repeat the search / mount process as many times as you need to.
While in the Find section, you can also perform some basic APE utility commands, such as [S]wap drives, and [R]elease Image.
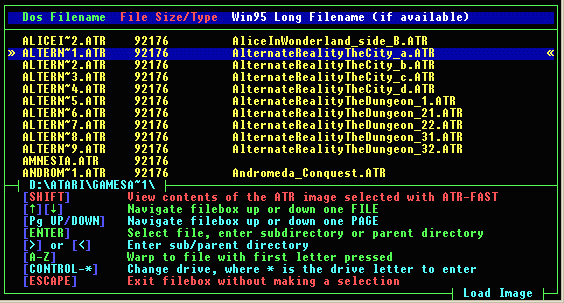
This function is used to select an already created ATR image file and mount it in the drive 'bay' of your choice.
You will first be prompted to select the bay # for the image your going to load. If an image in already using that bay you will be prompted to confirm before displacing it.
Once you have selected the drive bay, you will then be asked for the filename of your disk image. If you know the filename and want to type it in you may, or you can just press RETURN for an easy to use file selector with which you may browse your ATR images.
After you select the name of your image, APE will take care of everything else such as reading the image configuration, etc, and mount it for you in your selected bay.
If your image contains an Authentication Signature, it will be evaluated and if the CRC does not match you will be notified.
PROTECTED DISK SOFTWARE
APE can now emulate ALL copy protection, even the most complex 'Phantom' sector schemes.
Using a special program to read your protected disks, APE can create .PRO disk images. This is a new form of disk image, incorporating timing, error and other information critical to emulating the copy protection present on the orignal diskette.
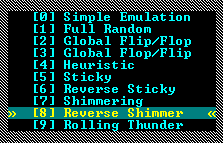
APE can currently emulate defective sectors and the resultant contents of the FD1771 status register when reading them. APE can also emulate protection schemes that do not produce controller errors, such as the Phantom Sector protection used on Electronic Arts titles.
APE has been tested with the following software originals and has performed perfectly.
These PRO images are not 'cracked' copies of games, but contain information representing the real copy protection on the original diskette:

As other images are reported to work by registered users, they will be added to this list. Based on the complexity of the copy protection used by the above companies, I am confident that APE can emulate 100% of existing software.

The PC MIRROR is by far one of the most powerful features available to you in APE. When you mount at drive as a 'PC MIRROR' that drive acts like a window to the files that actually reside on the MSDOS portion of your PC hard drive.
Where before it was very difficult to get files from your PC to your Atari, using null modem cables, modems, terminal software, etc; You can now access these files DIRECTLY!!
The new APELOADER Software of the PC-MIRROR provides the ULTIMATE bootloader, by giving you access to all your EXE files directly from the Atari keyboard, using a simple and functional menu interface.
You can access the APELOADER at any time by simply booting directly from your PC-MIRROR drive!
Lets try an example of using some PC-MIRROR services!
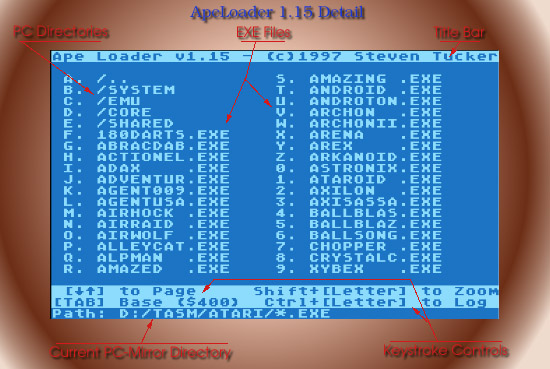
The ApeLoader will work with or without BASIC, on any machine type.
If you select a directory, the ApeLoader will change the directory on the PC, and automatically display the new listing of files!
If you select an Atari executable file (EXE, COM, etc), APE will verify it to be a valid Atari binary file, and load it automatically!
The memory footprint of the ApeLoader in Atari memory is less than 128 bytes! This makes the ApeLoader the most powerful and flexable binary boot loader EVER MADE for the Atari. It can load ANY file that does not REQUIRE dos.
Even if the binary file overwrites the ApeLoader, Ape can STILL LOAD THE FILE, becuase the ApeLoader can be relocated in memory!
The ApeLoader is also intellegent, and will try to start binary files even if they have had extra data appended to them via old style XMODEM transfers, etc!
The BASE ADDRESS is the area of memory inside the Atari Computer used to hold the ApeLoader Boot Code.
If your game/program tries to overwrite the ApeLoader while loading, just change the base address using this option and you can still load your program!
Ape can relocate its loader to page 4 ($400) or to the high stack ($110).
Boot MYDOS 4.5x and once at the main menu choose APE option 'S' and mount your PC mirror drive in bay 2.
Now, press '2' on the atari keyboard, you will get an atari directory of the files in the root directory of your PC hard drive! APE takes the information from your PC files and makes your atari THINK they are on a real atari disk!
Lets try and copy one of your MSDOS files to the atari. For this example we will use AUTOEXEC.BAT since most anyone with MSDOS will have this file.
Choose MYDOS option 'C' (Copy file) and then enter '2:AUTOEXEC.BAT,1'. This will tell MYDOS to copy file 'AUTOEXEC.BAT' off drive 2, and put it on drive 1.
Its just that easy! The entire contents of your PC hard drive are now at your fingertips!
Note: Files on the pc mirror are sequential access only! If you wish random access to a file on the PC MIRROR for editing, etc, simply copy it to an ATR drive.
NAVIGATING PC DIRECTORIES IN THE PC MIRROR
Getting a directory listing of the PC MIRROR directory of your PC will show not only the files there, but also the subdirectories on your hard drive.
One of my main goals when creating APE was to make it DOS independent.
SpartaDOS, MYDOS, etc all use separate methods for storing information in subdirectories, but APE will work with them all.
To change to a subdirectory on your PC MIRROR drive, all you have to do is to make the atari access that 'file' somehow. Its just that easy.
If you using MYDOS, use the 'L' command and 'load' the directory. You will receive an error, which is *NORMAL* and expected. APE is telling MYDOS that it cant load that file and mydos goes back to its main menu. Now press '2' once again. WOW! APE has changed directories and your now looking at the subdirectory you selected on your PC hard disk.
If your using SPARTADOS all you need to do is type the name of the directory (you may need to add a '.' to the end of the name if there is not extension, i.e. 'DOS.') and APE will do the rest. After you receive the error message, type 'DIR' once again and you will see APE has changed directories for you! :)
Also note that the subdirectory you are in contains a directory called 'UP'. 'L'oading or otherwise accessing this directory will cause the PC MIRROR to go UP the MSDOS directory tree to the parent directory. This is equivilant to the MSDOS command 'CD ..'
WRITING FILES TO THE PC MIRROR
Registered users may now WRITE files directly to the PC mirror using MyDOS. To transfer a file to the current PC MIRROR directory from your Atari all you need to do is use the MyDOS (C)opy command and copy your file to the PC MIRROR drive.
NO SPECIAL SOFTWARE OR DRIVER is required for this function! APE takes care of EVERYTHING for you, once the copy operation is complete, a file of the same name and size will exist on your PC hard drive! :)
This advanced feature will make file transfer problems between your PC and atari a thing of the past!
This toggle is useful for booting some programs that refuse to run on 'enhanced' drives. This switch may be obsolete since the addition of full support for Happy Warp Speed I/O. It was really only useful with SUPERDOS which now works perfectly in Happy Warp Speed Mode.
APE operates at full tilt, all heuristics are enabled and APE will respond to all special and enhanced forms of disk communication it understands.
All Ultraspeed SIO heuristics are disabled and APE will refuse any request to switch into an enhanced drive emulation mode. APE is most like a stock 1050 disk drive when used in this mode.
This command is left over from the early beta test versions of the program, and since I installed the new syncro code and switching logic I've never had to use it again.
Its is a completely integrated version of my Multitype file browser. Once you select the file to view, APE will determine what type of text is it automatically (atascii, etc). If APE fails to correctly display your text you can toggle the format manually with the [F] command inside the browser.
You may browse multiple files once the browser has been started by selecting the [N]ew filespec option. Press ESC to exit the browser.
Registered users may start the browser program from the command line, as a stand alone program within APE.
Write protect is a toggle, and your images may be unprotected by using 'W' on them again.
NOTE: This does not protect your images from being damaged by the MSDOS operating system, only by APE. As always, keep appropriate backups of your data.
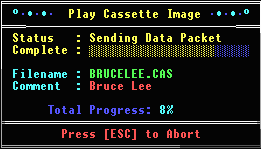
This feature is unrestricted and free for all users. An example .CAS cassette file is included with APE.
Playing files is a simple process, simply enter the filename (or use the lightbar selector to locate it), and APE will prompt you to press return to start.
Boot your Atari the normal way you would load the cassette, and press return at APE and the Atari at the same time. The cassette will then playback.
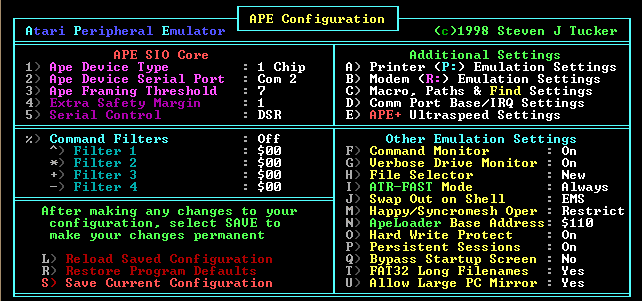
Its very important you set this correctly. If you have a 2 chip device and you set it to 1 chip, it will fail to function correctly or will cause interference with other, real SIO peripherals.
If APE switches to ultraspeed when it should not, you may have the framing threshold set too low. A setting of below 8 may cause this.
If APE fails to switch into ultraspeed when using mixed speeds, and you get command timeouts or drive errors, you may have the framing threshold set too high.
This will depend greatly on the speed of your machine. I recommend a setting of 8 for most machines, but if this causes problems you will need to experiment with this setting. Framing thresholds of below 4 or above 15 are of no use and are not allowed.
All other switches in this field control the HEX value of the filters you wish to use.
You can change to the old file selector if you dont like the new one using this option.
Because the new file selector needs the whole screen for Win95 support, the ATR-FAST mode is always Shift-Driven when using the new selector, regardless of this setting.
For example, with persistent sessions turned ON:
With Persistent Sessions turned off, APE will start each session with 8 empty drive bays.
This feature is not available to unregistered users.
This feature is not available to unregistered users.
Spartados X for example, is not capable of reading from Atari DOS formatted hard disks due to a problem in the ATARIDOS.SYS driver.
If you experience any problems reading or writing to the new PC-MIRROR, you may set this option to 'NO' to force APE to use the old, smaller, PC-MIRROR.
A rom patch for Spartados X is available.
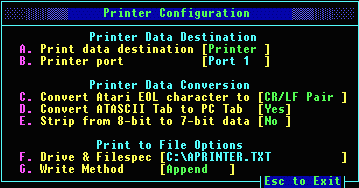
Values set in this section can be saved to APExxx.CFG.
If your printer requires line feeds (such as the HP deskjet series) then select YES. If your printouts are all on one line, text overlapping text then your printer requires line feeds and CR/LF should be selected.
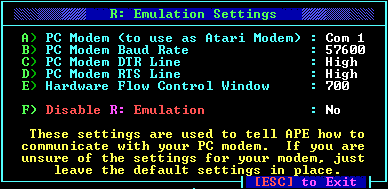
This option sets the overflow queue size after which hardware flow control will be used.
A setting of 700 is default.
It is reccomended that you use this switch if you do not have a modem attached to your PC.
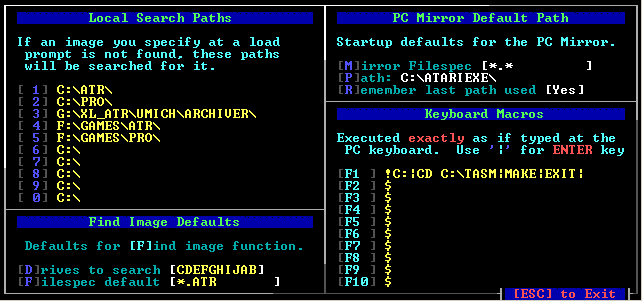
Values set in this screen may be saved to APExxx.CFG.
Specify upto 10 locations on any device attached to your PC, and APE will automatically look in those directories each time you specify an image that is not located in the current directory.
For example: you press [L] to load an image, and type MYDOS.ATR in the quick load box. If MYDOS.ATR is not found in the current DOS directory, APE will look in all the paths specified here for it automatically.
All characters entered in your macro will be executed EXACTLY as if you had typed them from the PC keyboard. The only exception to this is the '|' character which is used for a embedded carriage return.
Any function that requires a RETURN when done should be trailed by the '|' character since APE will not press return for you be default.
This feature can also execute functions OUTSIDE APE! You can use the '!' function to shell to DOS inside your macro and any remaining keystrokes will be executed by your dos shell. (i.e. '!EDIT AUTOEXEC.BAT|' would cause APE to shell to DOS and execute EDIT AUTOEXEC.BAT)
Example: Setting F1 to the string '!C:|CD C:\TASM|MAKE|EXIT|' and then pressing F1 at the APE main screen will:
For example: if you last accessed a file via the PC-MIRROR in C:\MYFILES\ then APE would start in that directory next session.
If this is set to NO, APE will use the values entered here as the default pathname, and filespec each time it starts.
This menu will allow you to confure APE to function with the IRQ/BASE address settings used on your computer. APE is pre configured with the 'standard' AT values for these ports, so you should only need to use this function if APE fails to perform properly for you.
To find the IRQ/BASE address of your com port use the MSD.EXE utility provided with MSDOS v5 and above, or consult your users manual.
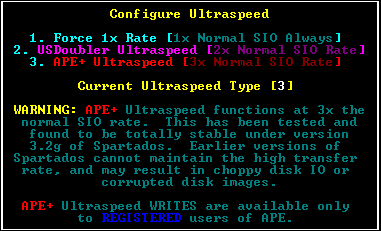
This option effects ONLY the operation of US DOUBLER type I/O and has NO EFFECT on the operation of other high speed systems such as Happy Warp Speed or XF551 mode.
No special software or patch is required to use APE+ Ultraspeed. Spartados 3.2g will AUTOMATICALLY switch to this mode at bootup when APE instructs it to.
APE+ IO pushes Spartados to its serial speed limits. You should use FTE's Spartados 3.2g (earlier versions may not be fast enough) and have KEY turned OFF. Having KEY turned on slows the Atari to the point it cannot keep up w/ APE+ 3X SIO.
To get the very most from APE and 3x SIO, check out the Ape Warp+ OS Upgrade.
You may use any program that is compatible with the Atari 850 interface. No additional software or hardware is required!
For this example we will use BOBTERM. If you already have bobterm make sure you use the bare version of the program that does NOT have an R: handler appended to it.
Load BOBTERM using your favorite DOS. Upon loading, BOBTERM will 'call' for the 850 interface handler. APE will download its own resident handler and bobterm will finish loading.
Notice your APE screen now says 'Concurrent I/O running', it has been commanded by BOBTERM to start talking to your PC modem!
Make sure BOBTERM is set for 19.2k bps and then go ahead and enter terminal mode. You should be able to type commands to your PC modem just as if it was attached through an 850 interface!
If you cant seem to talk to your PC modem go back to the configuration section and review the instructions for setting up your modem with APE. Also, make sure bobterm is set for 19.2k bps.
Unregistered Users Note: You also should set your terminal rate to 19.2k bps but your actual throughput will be restricted to 2400 bps until you register.
A: While some dos systems, such as Spartados have native support for speed-enhanced peripherals, no games or other software by default support it. To get Ape Warp+ 3x sio at ALL times, even in games, check out the Ape Warp+ OS InfoPage.
A: The APE Cable is designed to allow the PC to emulate Atari peripherals. Using it, your PC pretends to be a wide range of 100% SIO compliant Atari 8 Bit peripherals.
A: The PRO System cable is designed to to allow Atari PERIPHERALS such as the 1050 disk drive to be attached directly to the PC. Using a special software package I have developed, called the Pro System, you can use this system to create .PRO images of even the most complex copy protected diskettes using only a stock 1050 disk drive. Or just ATR images at high speed if you choose.
A: The PRO Cable does NOT perform the functions of the APE cable. Once the .PRO images have been created, you can use your REGISTERED Ape software to load the images and emulate the peripheral behavior using the APE Cable.
A: Remember! The .PRO cable is used ONLY to CREATE disk images.
A: For the illustrated HTML version, check here. For a plaintext version check PROSYS.DOC in the APE distribution.
A: APE is provided in its current form for your evaluation. Even in its UNREGISTERED form, it provides unmatched power, speed and flexibility. You are given free of charge the ability to 'try before you buy' all of APE's powerful features, such as the PC MIRROR, Copy Protection Emulation, R: Modem emulation, 3X SIO operation, unmatched hruristic Ultraspeed speed switching, Diskcomm3 compatibility, and much more!
A: If you are a registered user, and cannot get your title to run under APE using all the available emulation modes, it it possible I can add a new emulation mode that can deal with this new scheme. Please send the original or 100% functional copy to me at the address listed in REGISTER.DOC and I will do my best to make it part of the next APE release.
A: When you create a 'disk image', it is the same as a real floppy disk you bring home from the store. Its totally blank and needs to be FORMATTED with your favorite DOS before it can be used. See the above section on creating disk images for more assistance.
A: With the serial conversion device attached to the SIO port of your Atari computer, the atari cannot tell APE from a real Atari disk drive. If you mount an image in drive 1 and turn on the Atari it will boot from that 'disk' just as if it were a real drive. Ever better because APE is faster than a real disk drive.
A: NO. Ape stores all its data and disk images in regular PC files like every other MSDOS application and will not harm, alter or otherwise interfere with the normal operation of your filesystem.
A: APE can cooperate fully with your existing SIO hardware such as disk drives, cassette drives, etc. Just make sure you dont assign an APE drive to the drive number of a REAL disk drive that is turned on. If both APE *AND* the real disk drive try to answer on the SIO bus at the same time it will confuse the atari and cause an error. Your serial conversion cable should be the last device on your SIO chain.
If you are using a 1 chip cable and are having interdevice interference problems, consider upgrading to a 2-chip
cable with a manual tri-state. It may help alleviate problems w/ an ultra-sensitive devices.
A: If you wish to move your data to faster more reliable ATR images all you need is a floppy drive capable of reading your disks.
This can obviously be a time consuming process. Future updates to the ProSystem software will allow the Pro cable to be used to create .ATR images in a fraction of the time this requires, and at a fraction of the time required to create the complex .PRO images.
A: Atari DOS 2.0 and other early dos systems were not by default capable of addressing disk drives higher than 2. (At $1000 each who had more than 2 disk drives back then anyway? :) You can attempt to patch your DOS.SYS file using the instructions available on many BBS's, or you can switch to a superior dos system. I suggest MYDOS because it is DOS 2 compatible.
A: When you use the '!' command to shell out to DOS, APE does not actually terminate. APE places itself into the background and launches a new copy of your command shell. To return to APE after using the '!' command, type 'EXIT' then return.
A: No. Any time the Atari writes to a disk 'image' APE updates that file automatically.
A: Yes! All copy protected software can now be emulated successfully with APE! Using the Pro System included and a stock 1050 (or 100% compatible) drive, you can create .PRO images of even the most complex diskettes.
See 'PROTECTED DISK EMULATION' in the APE users manual for complete information on .PRO images.
Internet E-mail: classics@nacs.net [this is the preferred addr]
dh395@cleveland.freenet.edu [emergency backup]
Telephone: 440-237-5308.
Anytime you can catch me at home
is pretty much ok. Just try and call before 11pm EST.
Snail Express
Steven J Tucker
9731 Sunrise Blvd #M-33
North Royalton, Ohio 44133
USA
7/30/98 1.17. Added or improved since 1.16.
1/30/98 1.16. Added or improved since 1.15.
5/13/97 1.15. Added or improved since 1.11b/1.12b
2/7/97 1.12. Added or improved since APE 1.10
5/22/96 1.09. Added or improved since APE 1.07:
11/20/95 1.07. Added or improved since APE 1.06:
9/2/95 Added or improved since APE 1.04:
Added or improved since public beta 8:
| Registered & Enhanced Version of APE | $39.99 | |
| Ape WARP+ OS Upgrade Option for XL/XE Computers | ||
| APE Warp+ XL/XE OS w/ Installation Kit | $49.99 | |
| APE Warp+ XL/XE OS Installed (see shipping note) | $79.99 | |
| Preassembled Interface Cables | ||
| APE 1489 Serial Interface Cable | $59.99 | |
| ProSystem .PRO Imaging Cable | $59.99 | |
| Imagic | ||
| Imagic-95 Registered and Enhanced | $10.00 | |
| Imagic-DOS Registered and Enhanced | $10.00 | |
| Get both IMAGIC-95 and IMAGIC-DOS. Save $5 | $15.00 | |
| Shipping ($5 USA, $6 Canada, $9 Abroad) | ||
| Subtract Discount ($5 discount per interface cable purchased if registering APE) | ||
| Total + Shipping |
Company ________________________________________________________
Address ________________________________________________________
_________________________________________________________________
____ _____________________________________________________________
_________________________________________________________________
Phone _________________________ FAX _________________________
How did you get your copy of APE?
_________________________________________________________________
_________________________________________________________________
_________________________________________________________________
Suggestions or Comments:
_________________________________________________________________
_________________________________________________________________
_________________________________________________________________
_________________________________________________________________
_________________________________________________________________
_________________________________________________________________
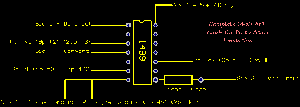
Sio Orange (Sio Pin 3) -> Diode Clear End & Diode Band End -> 1489 Pin #8
Sio Lt Blue (Sio Pin 10) -> 1489 Pin #14
Sio Black (Sio Pin 4) -> 1489 Pin #7
Sio Purple (Sio Pin 7) -> 1489 Pin #4
Sio Green (Sio Pin 5) -> 1489 Pin #1
PC Signal Ground (9p #5) (25p #7) -> 1489 Pin #7
PC Ring Indicator (9p #9) (25p #22) -> 1489 Pin #6
PC RXD (9p #2) (25p #3) -> 1489 Pin #3
PC TXD (9p #3) (25p #2) -> 1489 Pin #10