Having acquired an Atari ST, I went through the
phases I imagine many new owners experience – starting off by
finding out how to get the computer powered up, playing a few
commercial games and trying some public domain software and finally,
when the immediate euphoria wears off, actually attempting to
program the machine yourself. It is at this point that you discover
that ST BASIC is not exactly the world's ideal programming
environment – not that it isn't a powerful interpretation of the
language, but more that the screen editor provided must be one of
the slowest and most unfriendly ever written, and that you are
denied simple access to one of the features for which the ST is best
known – the GEM interface. At that point I decided that I needed a
more powerful language than ST BASIC, and with a certain amount of
trepidation opted for the one that many others seemed to be using,
particularly in the USA, the C programming language. I haven't
regretted my choice for one moment. Using C to program the ST and
make full use of GEM is so easy and produces such fast programs that
I never want to return to ST BASIC again.
It occurred to me that Page 6 readers who either own
a C compiler and have not yet started to use GEM, or those of you
thinking about buying a compiler might be interested to see how it's
done and so hopefully avoid some of the traps I fell into and so
this first article came into being. I hope that you will learn with
me as we examine the ways in which C can be used to program the
graphics of the ST. I hasten to add that I am very much a novice in
both C and GEM, and I hope more experienced programmers will forgive
the need to state facts and principles which to them must seem
obvious. Many ST owners, however, are still at the novice stage as
regards C programming and it is for them, primarily, that this
series is written.
THE DEMO PROGRAM
I have always felt that articles of this nature are
likely to prove more interesting if a useful program is the eventual
result. The aim of what I hope will be a series of articles is to
produce a comprehensive demonstration of the graphics capabilities
of the ST which you can use for your own pleasure or to show your
family, colleagues and friends. To this end, I would welcome
suggestions from readers concerning aspects you would like to see
covered in these articles, or suggestions for graphic
demonstrations. Often the hardest part is not the actual coding but
thinking of something which will adequately demonstrate a particular
point.
I should point out that this is intended to be a
demonstration of GEM rather than how to program in C and some
rudimentary knowledge of C will be helpful, however even those who
do not know the language should find the discussion of the various
GEM functions useful, as the principle of using them from ST BASIC
is similar.
The demonstrations will take the form of a single
program which carries out a series of demos in turn. This will save
you having to type in the necessary initialisation code each time.
In this first instalment we will set up the system for the demos and
include a simple demonstration of animation using colour rotation.
This powerful technique is used in numerous graphic demos and once
mastered will allow you to write spectacular demos of your own.
 Demo Program
source code
Demo Program
source code
TYPING IN AND RUNNING THE DEMO
This first part of the program does not use any of
the more advanced features of C such as floating point numbers,
structures or unions, so it should be compatible with all the
currently available C compilers. One point to note is the #define in
the first few lines which defines 'WORD' as a short integer
variable. This is necessary because GEM functions expect to be
passed 16-bit integers and the compiler used to write this program,
Metacomco's Lattice C, uses a 32-bit integer as standard. In
Lattice, a short is 16 bits long as it almost certainly will be in
any other compiler, regardless of the integer size. However, check
your compiler, if a short is not 16 bits long you only have to
change the #define, not every occurrence of the short keyword in the
program. To run the completed program, double click on its icon and
click on the button of the alert box when it appears. You must be in
low resolution for this program, if you are not, the program will
tell you so. You can increase and decrease the rate of spin of the
disk by holding down the left mouse button; holding down the right
button will rerun the demo, while holding both buttons will return
you to the desktop.
PROGRAM INITIALISATION.
The listing starts with a couple of #include files,
and two #defines, one of which defines SOLID as the number one. This
is a constant used in selecting an interior fill pattern, and it is
included simply because SOLID means a lot more to a person reading
the listing than trying to figure out what significance a 1 might
have when passed to a function. This is followed by a series of
declarations; note particularly that the function demo1(), our first
demonstration, is declared as returning a short variable, rather
than the default int. The reason for this will become apparent.
The main() function comes next, and the first thing
this does is call the init_gem() function. This carries the
necessary initialisation code both for GEM and our demonstration. It
starts by calling three GEM functions. The first, appl_init(),
initialises GEM for a new application. The second, graf_handle(),
returns a very important variable, the name or device handle of the
current workstation. It also returns four other items of information
about the workstation, but we don't need these so we can just use a
dummy variable to put them in. Before we can open a new workstation
to draw in, we have to be able to pass certain parameters to GEM.
These are passed in intin[], and information received from GEM about
the new workstation will be found in intout[]. As you can see,
elements 1 – 9 of intin[] all contain the value 1. Table 1 gives the
meaning of these values for GEM. The function v_opnvwk() will open
our new workstation. It must be given the address of work_handle so
it can be modified for the new workstation.
Table 1. Values passed to GEM in v_opnvwk().
|
intin
element |
value
|
attribute affected |
result |
|
1 |
1 |
polyline type |
solid
line |
|
2 |
1 |
polyline colour |
black |
|
3 |
1 |
polymarker type |
dot |
|
4 |
1 |
polymarker colour |
black
|
|
5 |
1 |
text
font |
system
font |
|
6 |
1 |
text
colour |
black |
|
7 |
1 |
fill
style |
solid |
|
8 |
1 |
fill style index |
no effect as solid
fill chosen above |
|
9 |
1 |
fill
colour |
black |
Element 10 of intin[] is set to 2. This
is an instruction to GEM to use raster screen coordinates, i.e.
conventional computer graphic coordinates with point 0, 0 in the top
left corner and a resolution of whatever the computer concerned can
offer. The alternative is Normalized Device Coordinates (NDC), which
is based on a standardised screen of 32767 pixels vertically and
horizontally. This offers the possibility of writing graphic
applications which are independent of a particular computer's
hardware.
Much of the information returned in
intout[] will not be of interest to us if we
are writing programs specifically for the ST. However, intout[]
elements 0 and 1 will return the maximum horizontal and vertical
resolution respectively, useful if you are writing software that
will run in more than one resolution.
The rest of init_gem() contains code specific for our
application. The demonstration will use colour rotation so the first
thing we do is to move the colour palette into an area of memory
where we can manipulate it. The Setcolor() function is not a GEM
function but a call to the ST's operating system (it is an XBIOS
call). The general format of Setcolor() is as follows:
Setcolor(colour number, colour value)
where colour number ranges from 0 to 15 and colour
value is a 16 bit number representing the RGB value of the colour.
But Setcolor() does more than this. It also returns the old colour
value to the user, and if the colour value supplied to it is
negative, it is ignored. In other words, Setcolor() as used here has
the effect of changing none of the colours but copies the present
16-colour palette into the array old_pal[]. This array will be used
to reset the palette to its original value on leaving the program.
The next two lines simply copy old_pal[] into new_pal[] which will
be used for the actual colour rotation.
The next statement is also an XBIOS call. Getrez()
does what its name implies – it returns the current screen
resolution. This is important to us, since this program will only
work in low resolution. The values returned are as follows:
0 low resolution
1 medium resolution
2 high resolution
Having determined the resolution, the program checks
to see if the user is in fact in the required resolution. If not, an
alert box is put on the screen to inform the user and the variable
'finished' is set to 0. Alert boxes are printed using the GEM
function form–alert, and are simplicity itself to use. The general
format is as follows:
button= form_alert(default button, alert string)
where button is the number of the button the user
clicked on and which can range from 1 to 3. The default button is
the button which is selected by pressing the Return key as well as
clicking with the mouse; it too can range from 1 to 3, or be zero in
which case there is no default. Examples of the alert string can be
seen as res_alert and hello_box. The general format is:
(icon)(text with lines separated by the : character)(
button 1 : button 2 : button 3)
where icon is the icon displayed on the left side of
the box. Possible values for this are:
1 exclamation mark
2 question mark
3 stop sign
You can have a minimum of one and a maximum of three
buttons. Since we only have one button in each of these boxes we
don't need to know which one was clicked on. If the screen
resolution is anything other than low, the string res_alert appears
in the box; otherwise hello_box is used. On return from init_gem(),
main() checks the value of the variable 'finished'. If this is
anything other than zero, the statements in the while loop are
executed; if it is zero, these statements are not executed and the
function finish_gem() is called. Assuming the loop is executed, the
demo is called as demo1(), which will return a short in the variable
'c'. If c is returned as greater than 2 the program will break out
of the loop, set finish to zero so that the loop is not executed
again, and call finish_gem() to exit the application.
LET'S START THE DEMO!
Now for the demo itself. The first thing to do is
reset the colour palette so that we can manipulate it. This is done
with another XBIOS call, Setpalette(), which is provided with the
address of the new palette as its argument. We then hide the mouse
cursor since we don't want it on the screen, with the GEM function
v_hide_c(). Function v_clrwk() then clears the screen using the
current background colour (always found in colour 0 of the palette).
To be absolutely sure, although we have already done it during the
open workstation routine, the interior fill style is set to solid
colour with the call to vsf_interior(). The format of this call is as
follows:
vsf_interior(device handle, style)
where style can have one of the following values:
|
style
|
result |
| 0 |
hollow – i.e. outline only,
no fill |
| 1 |
solid colour |
| 2 |
pattern |
| 3 |
hatch |
| 4 |
user defined pattern |
If pattern or hatch styles are chosen you can choose
from a variety of preset patterns using another function, vsf_style().
We will look in more detail at this at another time. You can even
define your own fill pattern using function vsf_udpat().
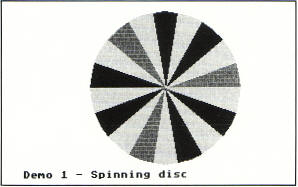
The aim of the demo is to draw a disk composed of
segments of different colours so that by rotating the colour palette
we give the illusion of a spinning disk. The function which draws
the circle segments is v_pieslice, which uses the following format:
v_pieslice(device handle, circle centre x-coordinate,
circle centre y-coordinate, circle radius, start angle, stop angle)
Most of this is self-explanatory, except perhaps for
the question of start and stop angles, which determine the position
of the segment in relation to the centre of the circle. These are
expressed in tenths of degrees, and can therefore range from 0 to
3600. An angle of 0 is due east, while 900 will be due north. By
incrementing these variables by a set amount each pass through the
loop, we draw a filled circle composed of a number of segments.
Before we can do this however, we have to set the colour to fill the
segment with, and here we run into a slight problem. The 16 colours
used in the low resolution colour palette are numbered 0 to 15, with
colour 0 being the background colour. Unfortunately, the GEM
functions use colour indices, also numbered 0 to 15, but which do
not correspond with their counterparts in the palette. In other
words (for example) colour index 1 does not use colour 1 in the
palette, but colour 15. If we draw with colour indices 1 to 6
therefore, but rotate colours 1 to 6 in the palette, we shall not be
rotating the correct colours. To avoid this, the array col_index[]
was set up which contains the colour indices in the order of the
colours they correspond to in the palette.
Having drawn the disk, the next task is to print the
title of the demo using the function v_gtext(). I don't want to say
anything more about this at this time, except that the height of the
text (in pixels) is selected by using the vst_height call. More
about this next time. Finally the colours are rotated by rotating
the contents of new_pal[] and calling Setpalette() each time the
array is changed (changing the array without calling Setpalette()
will have no effect).
The program incorporates a delay loop to slow things
down to a reasonable level. In order that you can see the effect of
altering the delay, the mouse buttons are checked using graf_mkstate(),
which returns the current mouse attributes. This has the following
format:
graf_mkstate(mouse x-coordinate, mouse y-coordinate,
mouse button, shift/control/alternate key state)
We are only interested in the mouse buttons here so
the other values go into our dummy variable. The mouse button
returns a 1 for the left button, a 2 for the right button and a 3
for both buttons at once. If the left button is pressed and held
down, the delay is increased by the value in step until a limit is
reached when it starts to decrease again. Holding down the right
button or both buttons at once will exit from the demo loop and
return the button value to main(). If this is 2 (right button only)
the demo is rerun; if 3 (both buttons together) the program will
return to the desktop, terminating by calling finish_gem().
The finish_gem function is very straightforward. We
first bring back the cursor using v_show_c() which has this format:
v_show_c(device handle, reset flag)
where the reset flag is either zero or non-zero. If
zero, the cursor is redisplayed regardless of how many v_hide_c()
calls were made; if non-zero, the number of v_show_c() calls must
match that of the number of v_hide_c() calls for the cursor to be
redisplayed. The old colour palette is restored with Setpalette(),
and the workstation closed with v_clsvwk(). The application is
terminated with a call to appl_exit(), and the whole program returned
to the desktop by coming to the end of the main() function.
ALL FINISHED!
And that is it! You might say that it is a lot of
effort for a very simple demonstration and I would agree, but don't
forget that GEM gives us enormous graphic power that is generally
very easy to use. Regrettably the price we pay is an increase in the
amount of code needed to set things up. Although I have deliberately
used C to demonstrate some simple GEM functions in this article, all
these functions are also available to BASIC programmers, who might
like to try implementing the demo in BASIC. Next time we will look
at some more GEM functions and add another demo or two to the
program.
top