WRITE A GAME!
By now you should all have the
complete 'A-Z of ATARI BASIC’, and I hope that you forgive any mistakes
that occurred between my keyboard and the final copy.
The Editor and I have been discussing
how best to follow this set of articles and he has talked me into
trying to write a game, a section at a time, to illustrate BASIC
and involving reader's participation. This sounds easy until you
sit in front of a blank screen but one reader has come to my rescue.
Albert Bidwell recently asked me how to write a noughts and crosses
game and I have decided to use this game to explain some of the
commands that were in the 'A-Z'. The examples used will follow most
of the rules of programming, but will deviate where necessary so
that it is easier to explain. I hope that I can keep this set of
articles on a simple level to introduce the beginner to programming.
I hope that you are not sitting
back saying, 'Oh great - a free game!'. I warn you here and now,
I am expecting lots of response from the readers and if I don't
get it the project may be doomed. I want you to improve the program
in any way you can and send me your ideas and your own programming
examples to illustrate how the game should be improved. Letters
should be sent to me as soon as possible to give me time to set
up the next article. You can still contact me direct with any problems
but do enclose an S.A.E. if you require a reply.
As the next issue will be early
for Christmas there will not be time to include your ideas in the
next column but I would like to hear from as soon as possible so
I can plan ahead. Remember though, without your response the column
is doomed!
Let's start. Normally we would
start any program with a rough idea of how we want our game to run,
i. e. the object of the game, rules, scoring etc. but as everyone
already knows the game of noughts and crosses we can pass on to
the initial flowchart of the game - termed the ALGORITHM. I have
included an explanation with the algorithm, but in order to get
you started I have also included a small program to show you how
the 'FINISHED?' and' AGAIN?' boxes work. Check out the program listing.
The REMs should make it self explanatory enough.
If you now refer to the diagram
you will see that the introduction screen is set up as a GOSUB routine.
This is for reasons of speed as whenever a GOTO or GOSUB is used
the computer starts at the beginning of the program to search for
the required line. It will run far quicker having the main play
sequence as near to the start of the program as possible.
If memory space is critical all
DIMensioning and initialising must be done first but it is preferable
to set up the screen so that the players have something to look
at while the computer is busy with its housekeeping. Once the screen
is set up, all INPUTs must be answered and any errors must be TRAPped,
otherwise the program will stop execution.
The algorithm may seem complicated
and tedious, but in practice it is very simple. The graphics take
up most of the listing and the error trapping only a few lines.
Type in the listing and try some silly responses. Because the computer
only checks for illegal strings it will take any legal input as
your true name. If your name is longer than the length to which
the name string is DIMensioned it will only store to the dimensioned
length, so if you need more space use a longer DIMensioned string
(A$ and B$).
Here are a few notes to help you
with the program. Notice that the subroutine starts at 5010 and
that I have placed a REM statement at 5009. Never, ever, send the
program to a line containing just a REM statement. Many people tend
not to type in these statements and they are the first to go when
more space is needed. So do not risk an ERROR 12 (look it up!).
The rest of the program should
be easy enough to work out. Line 999 stops the program trying to
run the subroutine again which would give an ERROR 16. This type
of line is normally one of the first lines I use and the last to
be deleted. POKE 559,0 switches off the screen causing the computer
to work faster and the drawn screen to appear fully completed. CMPTR
is the GOSUB address of the computer routine. CO is a flag to indicate
that the computer is the opponent and COUNT is the flag for checking
the number of turns. Notice in line 5020 the cursor control characters
to save on a POSITION statement. The TRAP statement at line 5025
will send the program back to line 5020 if an illegal response is
given to the question (starting a string with a number etc.), giving
ERROR 8. If the responses are valid then TRAP 40000 clears the TRAP.
CO decides if you will be playing the computer. The final part of
the program sets up the main play screen and switches on the screen
with POKE 559,34. As the game is configured for the main play screen
we will keep that as it is, however, I would like to see you try
your hand at a new intro screen, that is, something to replace lines
5000 to 5020. You can go beyond 5020 if you wish as it is an easy
matter to renumber the remaining lines.
Now that you have seen part of
the program I will set you your first task. I would like over the
next few weeks some intro titles with the best sound and graphics
you can manage. In future columns I will publish different parts
of the program but please do not expect to see the completed game
for some time to come. If Les has the space he might include the
completed program in the final part of this tutorial. Please print
your program as neatly as you can. Underlining means inverse and
square brackets mean control characters.
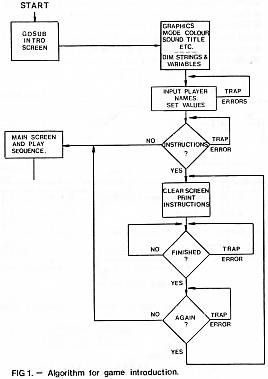
ALGORITHM DIAGRAM EXPLANATION
We enter the algorithm at START.
The first thing we encounter is a box that sends us to a GOSUB routine
setting up the introduction screen. The box on the right shows us
some of the things that must be done to set up this screen. When
you have set up the screen to your own satisfaction, follow the
path to the next box. At this point the player inputs information.
If an ERROR occurs then a TRAP must be used to send the program
back to the start of the input, otherwise the program will STOP.
The next box is a decision. 'DO YOU NEED INSTRUCTIONS?'. If not
then the program returns to the main sequence. If you do need instructions
then continue down the path. Again errors must be taken care of.
The next step is to clear the screen and print the instructions.
Then the program waits to see if you have finished. This part is
usually controlled by 'PRESS ANY KEY TO CONTINUE'. No input and
it will wait. YES will continue the program. The next step asks
you if you wish to view the instructions again. This can also be
used if the instructions cover more than one page. YES sends the
program to the point where you said YES to the question 'DO YOU
NEED INSTRUCTIONS?'. If you decide you have seen enough, then the
program returns to the main sequence. Again, errors must be taken
care of.
|
|
|
 |
top